Sourdough Brioche Buns

After a lot of trail and error I’m finally feeling pretty good about these brioche buns. I extended out the fermentation cycle which makes the process a bit longer, but it pays off with the end result - a lighter, airier brioche that is perfect for sandwiches, burgers, or French toast. Video of the process below.

burger 1.jpg

Ingredients

250 g bread flour

90 g eggs (about two medium sized eggs)

50 g butter (cubed)

50 g white sugar

45 g water

5 g salt

100 g active starter

1 more egg for brushing on before bake

*This recipe is a small batch of 4 buns. Multiply according to how many you want.

From start to finish this takes about 44 hours total.

dough in bowl.jpg
shaped balls.jpg
finished buns.jpg

Directions

  1. 9am Day 1- Feed/activate your starter. I won’t go into too much detail here about starters, levains as there are many other amazing resources already available online - but I find that it is essential for this recipe that you are working with a very active starter when you get to the next step of mixing.

  2. 12pm Day 1- Mix all of the ingredients together in a stand mixer. It is possible to do this by hand but it will take a lot more time and effort to achieve the same result as the mixer. With the butter, eggs, and sugar this dough really needs to be worked together more than a regular loaf of bread. Start off on slow and gradually increase the speed for 15 minutes, periodically scraping the edges of the bowl with a rubber spatula. The dough will be somewhat sticky, but after 15 minutes it will be smooth, homogeneous, and should hold together nicely.

  3. 12:15pm to 8:00pm Day 1- Transfer to a metal proofing bowl and cover and leave out at room temperature for the first fermentation cycle. Key here is that the dough should be folded 4 times over the course of this cycle to develop the gluten and structure of the bread. After mixing I will wait about 30 minutes before doing the first fold (by hand). Let the dough relax again for about another 30 minutes and do the next fold, and so on. Keep the dough covered when not folding it. It will get progressively easier, smoother, during each fold.

  4. 8pm Day 1- Transfer the dough to the refrigerator for an overnight cold ferment.

  5. 8am Day 2- Remove the dough from the refrigerator and leave at room temperature for about 10-15 minutes. This will give it a little time to loosen up and not be so stiff coming out of the refrigerator. Gently dust a work surface with flour and dump the dough out. Divide into 4 equal pieces. Gently pull the edges of each piece out and fold over on top of itself. Rotate as you go and you’ll begin to form a small, smooth, ball of dough. Work carefully not to tear the dough. Turn the ball over and continue to shape the dough, working the edges downwards and folding underneath. The video I’ve made will help with visualizing this part of the process.

  6. 8:15am to 8:00pm Day 2- Lightly flour a tray and set your dough balls inside, leaving a few inches of space between to give them room as the continue to proof. You’ll need to cover them during this step. You also don’t want the dough pressing against whatever cover you’re using. If using plastic wrap or foil I will place an object in that is taller than the edges of the tray so that it creates a tent. Since I’m not working in a professional kitchen setting and don’t have access to equipment to control humidity I will ball up some wet paper towels and stick them in the edges of the tray during this part of the process to keep some ambient humidity as they proof at room temperature.

  7. 8:00pm Day 2- Transfer the entire covered tray into the refrigerator for the final cold phase of proofing.

  8. 7am Day 3- Remove from the refrigerator and allow to come to room temperature for about 30 minutes. Set your oven to 425F. I bake directly onto a baking stone for this recipe and use parchment paper as a barrier between the buns.

  9. Transfer each dough ball (carefully so they keep their shape) onto parchment paper. Brush each dough ball with egg wash. Using a bread lame, slash the tops of each ball in an X pattern. Using a pizza peel, or large spatula, transfer to the baking stone. I like to use a big pizza peel, so all my dough balls are on the same piece of larger parchment paper. You could just as easily cut individual pieces of parchment for each dough if necessary.

  10. Bake at 425F for 15 minutes until golden brown. Remove from the oven and allow to cool for at least 15 minutes before slicing.

  11. For burgers and sandwiches I like to toast these in a lot of butter straight onto a cast iron pan, with a lid so they steam a little while they toast up. You’ll definitely miss out if you skip this step.

brioche crumb.jpg

The Smash Burger

This burger uses a 60% venison 40% ground pork mix but would be just as good using 100% beef. The patties were pressed out between two sheets of parchment and kept cold until ready to cook. They’re seared on a hot pan or griddle until a strong crust begins to form. I flip these only once, add the cheese, caramelized onions, and char the second side. Because they’re so thin you’re not worrying about them being rare or medium rare. The juiciness will come from the rendered fat, melted cheese all coming together with the amazing crispy crust. Slide them onto a buttered and toasted bun, slathered with whatever sauce you like, press it down and enjoy.

Venison smash burger with caramelized onions, cheddar and special sauce.

Venison smash burger with caramelized onions, cheddar and special sauce.

Pork cutlet, micro-greens, lemon vinaigrette, aioli, pickled red onions.

Pork cutlet, micro-greens, lemon vinaigrette, aioli, pickled red onions.

Sourdough Bagels, Homemade Cream Cheese, and Gravlax

After a few iterations on this sourdough bagel I am finally happy to share the recipe. The texture and taste fall somewhere in between a New York and Montreal style bagel. Along with the homemade gravlax and cream cheese, this makes for an incredibly satisfying breakfast/brunch combination. A detailed video of the whole process is below.

finished bagels with lax.jpg

The Bagels

The whole process takes about 22 hours from start to finish and a little bit of smart planning. Ultimately it is a very approachable recipe if you have the right ingredients on hand. I typically start my process around noon on day one and bagels will start coming out of the oven around 10am the next morning. These bagels are approximately 55% hydration which seems to be the gold standard when researching recipes.

Ingredients (for 5 bagels)

250 g water

65 g active sourdough starter

450 g bread flour

10 g salt

4 g barley malt syrup (for the dough)

3 g barley malt syrup (for the boiling water)

1 tsp baking soda (for the boiling water)

semolina (for dusting the tray)

Sesame and poppy seeds (for topping)

*The one ingredient you’re most likely not to have in your kitchen is the barley malt syrup. While it is possible to make bagels without it, it does serve a very specific purpose and is what many New York / Montreal bagel makers use in their formulations. It adds color, sweetness, and helps to condition the dough through the enzymatic processes that it contributes. If you don’t have barley malt syrup, you can use honey, brown sugar, or molasses to add a touch of sweetness - but keep in mind they function very differently.

Instructions

  1. Mix all of your ingredients together in a stand mixer with the dough hook (except for the additional 3 g malt syrup, baking soda, and semolina). Mix for about 10 minutes starting at the slowest setting and gradually increase to medium speed. This can be done by hand but it will take a lot longer to get to the right consistency. When fully mixed the dough should be tacky to touch, but not overly sticky. Cover the bowl and let ferment for 3 - 4 hours at room temperature depending on how warm your area is. Cooler ambient temperature will require longer ferment time.

  2. After 3 - 4 hours, dump your dough onto a clean (lightly floured) work surface and divide into 5 equal portions. Use your hands to roll each piece into a cylinder approximate 8 inches long and about an inch in diameter. Wrap the cylinder around your hand, press the two ends together, and gently roll the seam with your fingers to form a circular shape with a hole in the middle. This may take a few times to get it right, where you have uniform size all the way around each bagel.

  3. Transfer the bagels into a tray, lined with parchment paper and dusted with semolina. Cover with plastic wrap, and a light weight cloth or towel. Allow to ferment at room temperature for one more hour.

  4. Transfer the tray into the refrigerator to cold ferment overnight.

  5. In the morning, around 8am, remove the tray and allow to come to room temperature for about 30 minutes. Meanwhile bring a pot of water to a boil, mix in the baking soda and 3 g of additional malt syrup. Set your oven 500 F. Mix together the poppy seeds and sesame seeds (or whatever topping you like) in a medium sized bowl.

  6. Gently drop a few bagels at a time into the pot of boiling water. They may sink at first, but they should rise to the surface relatively quickly. Boil each side for about 1 minute each. Using a slotted spoon, transfer the boiled bagels to your tray for a few seconds, before transferring them into the bowl of toppings. Use your hands to roll the bagels around so there is a nice even coating on both sides. Transfer the bagels back into your tray. Repeat until all bagels are done.

  7. The bagels can be baked right in the tray or directly onto a pizza stone if you have one. Bake for 7 minutes and then flip, and then 7 more minutes - 14 minutes total time.

  8. Allow to cool slightly before enjoying.

Shaped and proofed.

Shaped and proofed.

Bagels will float when properly fermented and proofed.

Bagels will float when properly fermented and proofed.

seeded bagels.jpg

The Gravlax

This recipe is heavily inspired by a recipe from George Lang that my dad always used to make during the holidays. With the exception of a few minor tweaks, it is very similar to his original recipe.

Ingredients

2 pounds salmon with skin on

2 tbsp Aquavit or Vodka

1/3 cup coarse salt

1/3 cup white sugar

2 tbsp crushed black pepper

4 oz fresh dill sprigs (chopped)

Instructions

  1. Pat the salmon dry with a paper towel. Place it in a bowl or tray.

  2. Coat the salmon with the aquavit or vodka, rubbing it evening on all sides of the fish.

  3. In a small bowl, mix together the salt, sugar, pepper, and dill. Using your hands, pack the mixture onto all sides of the fish. Make sure there is an even coat all around. If some area seem like the fish is exposed, you can sprinkle on a little more salt.

  4. Place a piece of plastic wrap on top of the fish. Now you need something heavy to weigh down the fish. I use a small piece of bluestone, but anything will work. Wrap the bowl/tray/weight with another piece of plastic wrap to ensure it is completely sealed. Transfer into the refrigerator.

  5. After 8 - 12 hrs, flip the salmon over onto the other side, put the weight back on, wrap again in the plastic, and put it back into the refrigerator for another 12 - 20 hours. For a thicker piece of salmon, you’ll likely need more time so the salt can properly penetrate the meat.

  6. Remove the salmon and rinse in cold water. I like to leave a little bit of the cure on the outside, but that’s a personal preference.

  7. Now thinly slice the meat, and serve with crackers, on a bagel, or just eat it by itself.

Day 1: Packing the salmon with salt, sugar, pepper, and dill.

Day 1: Packing the salmon with salt, sugar, pepper, and dill.

Best when sliced thinly.

Best when sliced thinly.

bagels and gravlax.jpg

The Cream Cheese

It’s hard to compete with Philadelphia cream cheese, but what you’ll get by making your own is a heavenly and luxurious texture and something that feels a little more wholesome. The flavor is a bit more “farmy,” especially if using farm fresh milk and cream so it’s not for everyone - but for me the whole experience was well worth the effort just to be able to experience the difference between homemade and store-bought.

Ingredients

3 cups whole milk

3 cups heavy cream

1/4 tsp mesophilic culture

3 drops of rennet (dissolved into a tablespoon of water)

Chives/scallions (optional)

*You’re going to need a few obscure items here to make homemade cream cheese, but all are readily available either through Amazon or local distributors. Rennet, mesophilic culture, and butter cloth are all important to ensure you have success. This is a two day process, so you’ll need to plan ahead. I start my process at 2pm on day 1 and finish at about 4pm the following day.

Instructions

  1. Combine the milk and heavy cream into a heavy duty pot.

  2. Set your stove top to the lowest setting and bring the mixture up to 75/76 F. You need to pay close attention here so that it does not overheat.

  3. Once you’ve reached temperature, sprinkle in the mesophilic culture and rennet diluted in water, and stir until well incorporated.

  4. Cover and set aside at room temperature for 12 - 18 hours.

  5. When ready, you’ll notice that the whey has separated and there will be a big block of cheese that has coagulated. Take a spatula or spoon and gently break it apart.

  6. Line a medium sized bowl with a folded piece of butter cloth, and carefully transfer the cheese into it. Pull up the corners of the butter cloth, and tie it together in a tight ball. You’ll need to hang the ball over the bowl for the next 8 hours, so you may need to get crafty with how you do this. Over the 8 hours, all the whey will drain out, leaving you with a super creamy ball of cream cheese.

  7. Open the butter cloth and transfer to a clean bowl. It might seem a little stiff at first, but use a spatula to spread it around and reveal it’s velvety texture. Season with salt to your preference. Add in scallions/chives if you’d like. Enjoy!

After the rennet has done it’s work, this is the moment the coagulated cheese is broken.

After the rennet has done it’s work, this is the moment the coagulated cheese is broken.

Transferring the cheese into the butter cloth.

Transferring the cheese into the butter cloth.

Hanging the cheese for 8hrs to drain the whey.

Hanging the cheese for 8hrs to drain the whey.

The moment the butter cloth is opened.

The moment the butter cloth is opened.

chive cream cheese.jpg

Venison Reuben on Poppy Seed Rye

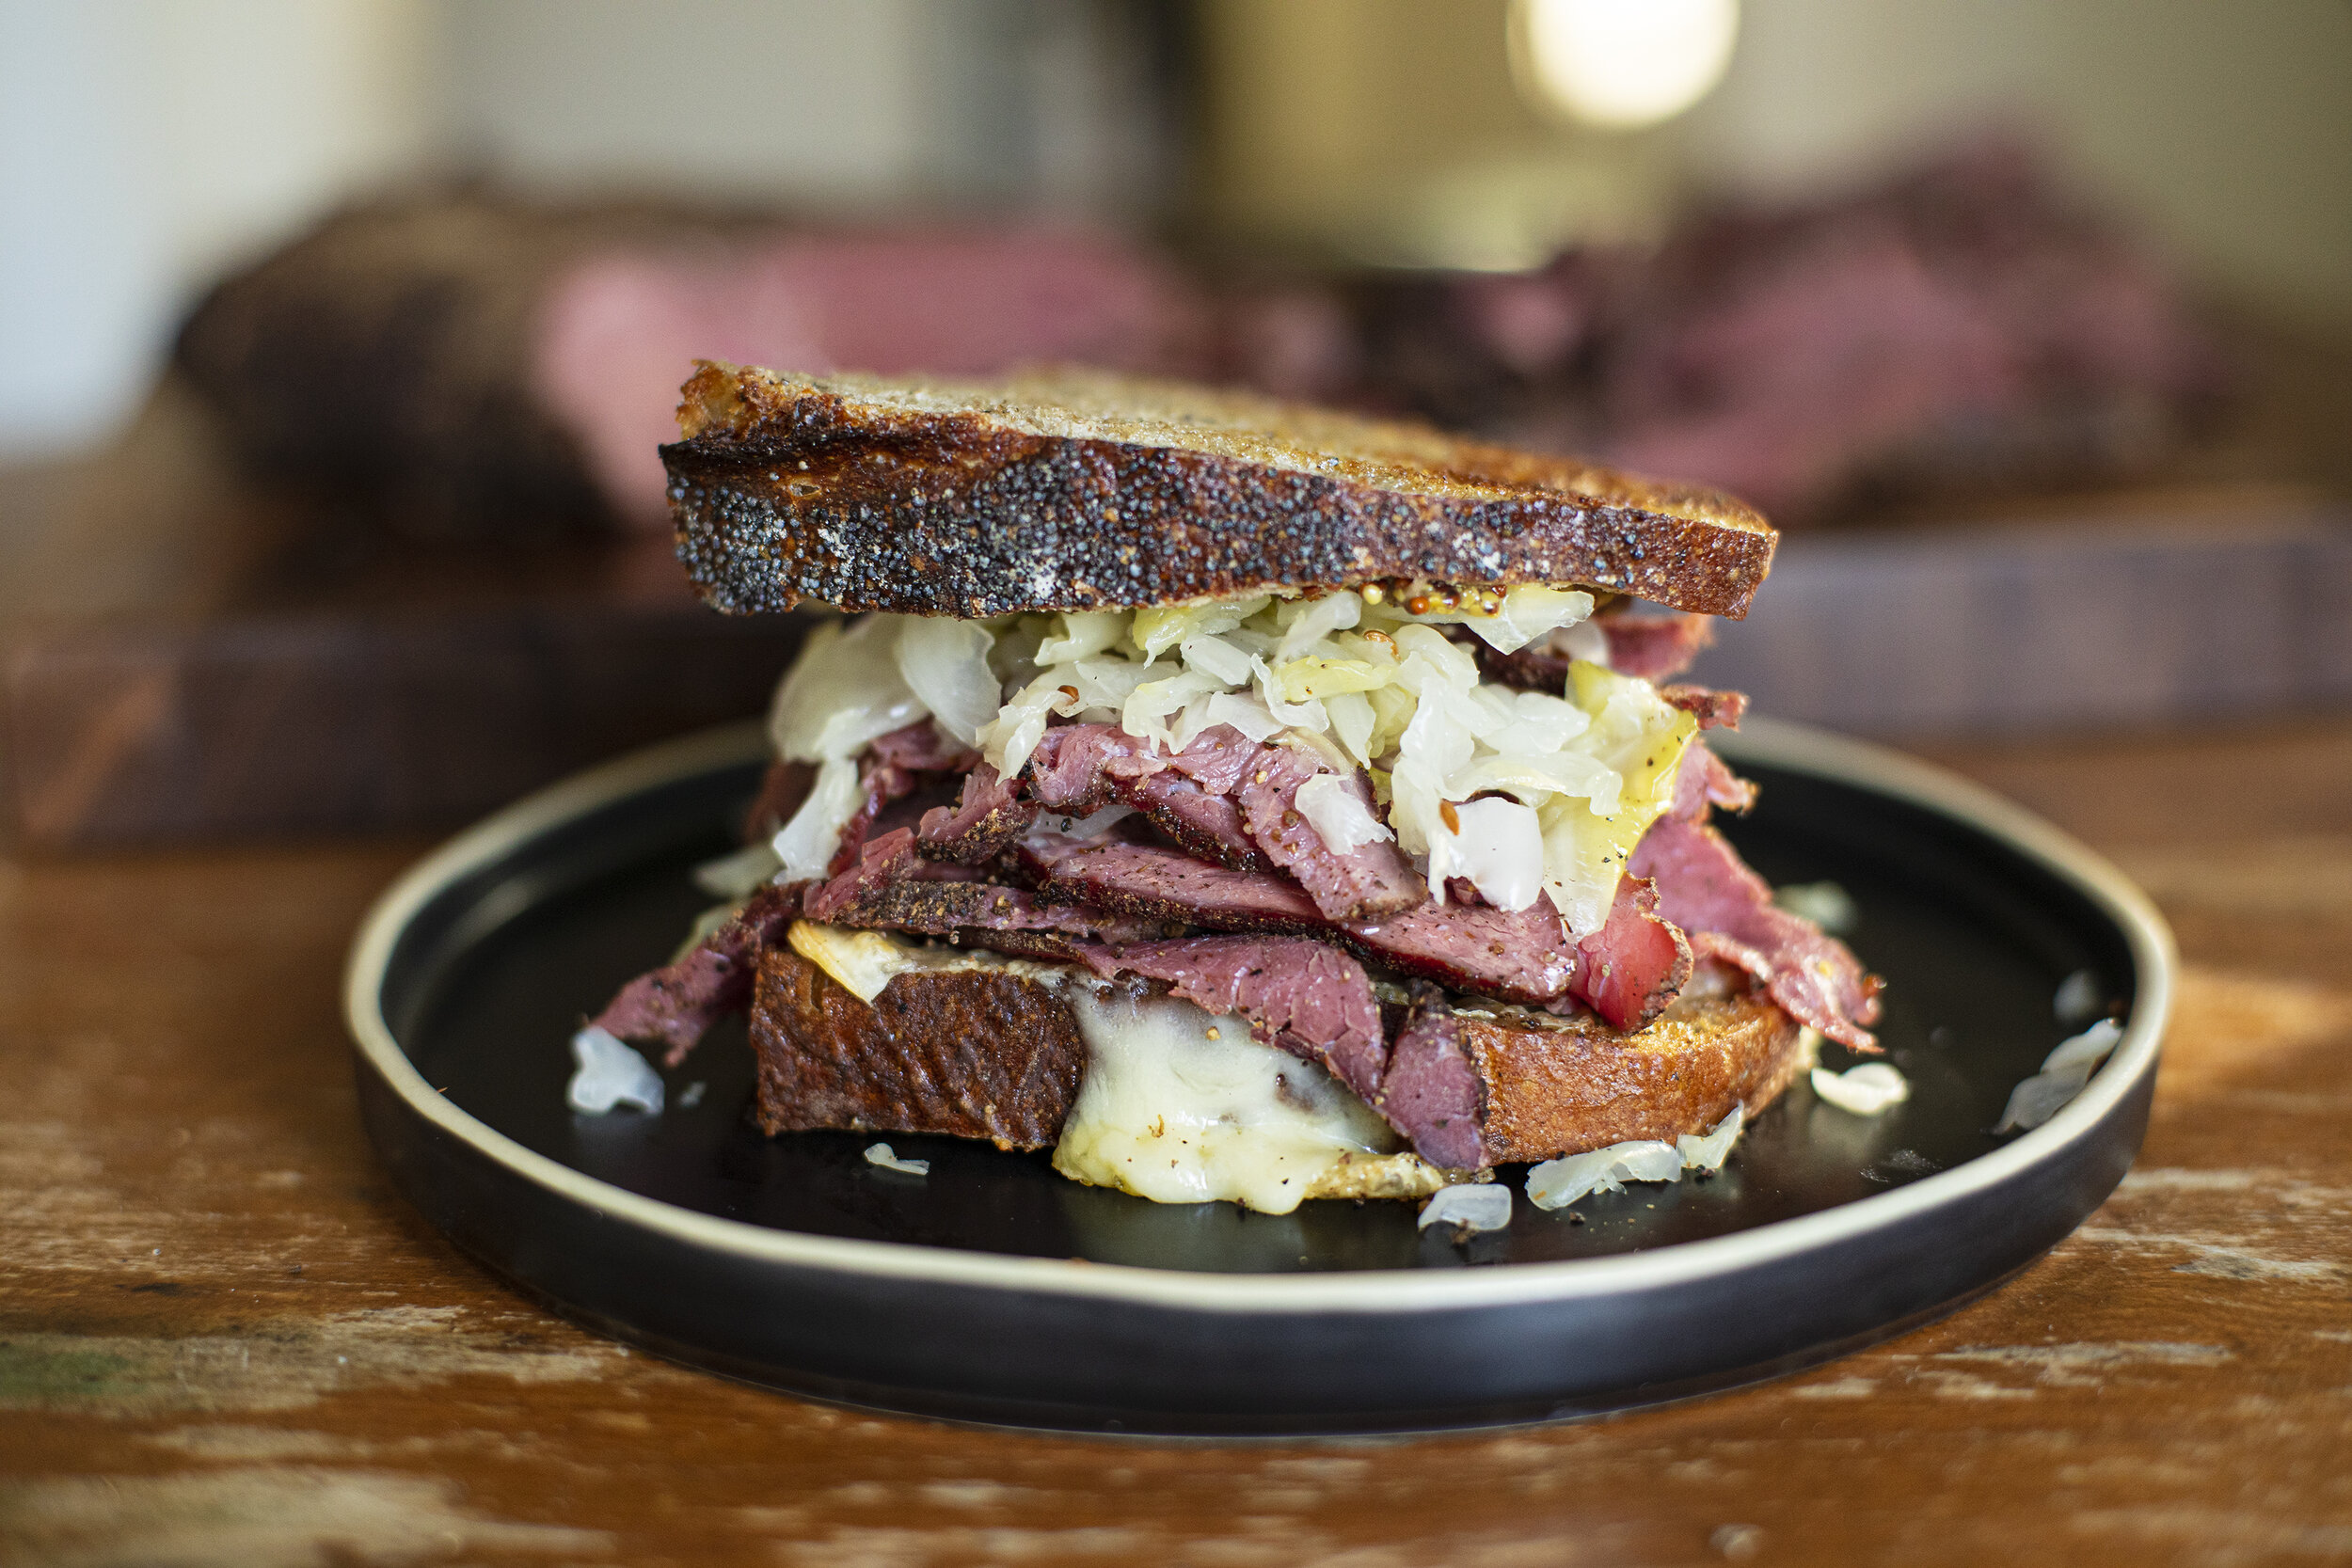
On the surface, this is just a sandwich. But a lot of labor and love went into the making of it. Months spent scouting the woods trying to find the perfect position. Cumulatively, there were probably dozens of miles walked. Early mornings watching the sun rise and light up the ice encrusted tree canopy as my feet felt like they were going to freeze. Then there was the harvest and the subsequent months of planning how to do justice to every pound of meat. Six more weeks for the sauerkraut and the fine tuning of the sourdough poppy seed rye. Six days for the cure on the pastrami. Three hours in the smoker. And just a few minutes to devour it. Was it worth it? I don’t regret any minute of it. 

Video of the process below.

pastrami sandwich.jpg

The Pastrami

First off I want to credit Hank Shaw for the basis of this recipe. For the most part I followed the fundamentals of his recipe but just tweaked a few ingredients and temperature/timing in the smoker. The cut I used for this recipe was the bottom round, cleaned and trimmed. 

Ingredients

The Cure

A 2 - 4 pound piece of venison (single muscle works best)

Kosher salt (2% of the weight of the meat)

Instacure No. 1 (0.25% of the weight of the meat)

1/4 teaspoon celery seed

1/4 teaspoon caraway seed

1 teaspoon sugar

1/4 teaspoon crushed juniper berries

The Dry Rub

3 tablespoons ground black pepper (1 tbsp per pound)

3 tablespoons coarsely ground coriander (1 tbsp per pound)

1/4 cup dry sherry

packing spices.jpg

Instructions

  1. Weigh your piece of meat. In a spice grinder, mix together all of the ingredients for the cure. Measure your salt and curing salt carefully based on the percentages listed above. 

  2. Using your hands, pack all of the spices and salt onto the meat, massaging it into ass nooks and crevices of the meat. Make sure all sides are equally coated. Transfer into a large ziplock bag, airtight container, or vacuum seal. The meat will now cure in the refrigerator for 4 - 6 days. Hank’s general rule is 2 days per pound of meat. 

  3. Remove the meat and rinse it off in a bowl of cold water to remove the bulk of the cure. Pat the meat dry and place back into the refrigerator uncovered for another 30 mins up to a day. 

  4. Using the spice grinder again, blend together the peppercorns and coriander spinkly it across the bottom of a baking tray, reserving some more to sprinkle on top.  

  5. Place the meat in a bowl and pour the dry sherry all over it and massage it into the meat. 

  6. Transfer the meat, coated in sherry, to the tray of spices and carefully work it around the dry rub so it is coated on all sides. Pack more of the dry rub on top with your hands until every part of the surface is covered. 

  7. Set your smoker temperature to 250F and smoke the meat for 2 - 3 hrs until the internal temperature reaches 145F. Allow the meat to cool and slice very thinly.

sliced pastrami.jpg
rye bread.jpg
saurkraut.jpg

The Sauerkraut

This is a pretty ubiquitous recipe that makes for a simple but delicious kraut. 

Ingredients

1 head of green (or red) cabbage

2% of the weight of cabbage in kosher salt

Caraway Seeds

Instructions

  1. Peel the outer leaves from the cabbage. Wash thoroughly. 

  2. Thinly slice cabbage and weigh it on a scale.

  3. Measure exactly 2% the weight of the cabbage in salt.

  4. In a large bowl using your hands mix together the salt of the cabbage. Massage it. Crush it with your hands until all the liquid from the cabbage starts to be extracted. Continue massaging for 5 - 10 minutes.

  5. Add in a sprinkling of caraway seeds. Mix together again.

  6. Pack all the cabbage and it’s juices into your fermentation vessel of choice. Use the outer leaves as a protective layer on top of the kraut and weigh it down with a glass weight or similar. 

  7. Allow to ferment for 4 - 6 weeks in a cool and dark area of your house. After 4 weeks you can transfer it to the refrigerator. 

  8. That’s it.

Sourdough English Muffin Breakfast Sandwich

egg porn shot.jpg

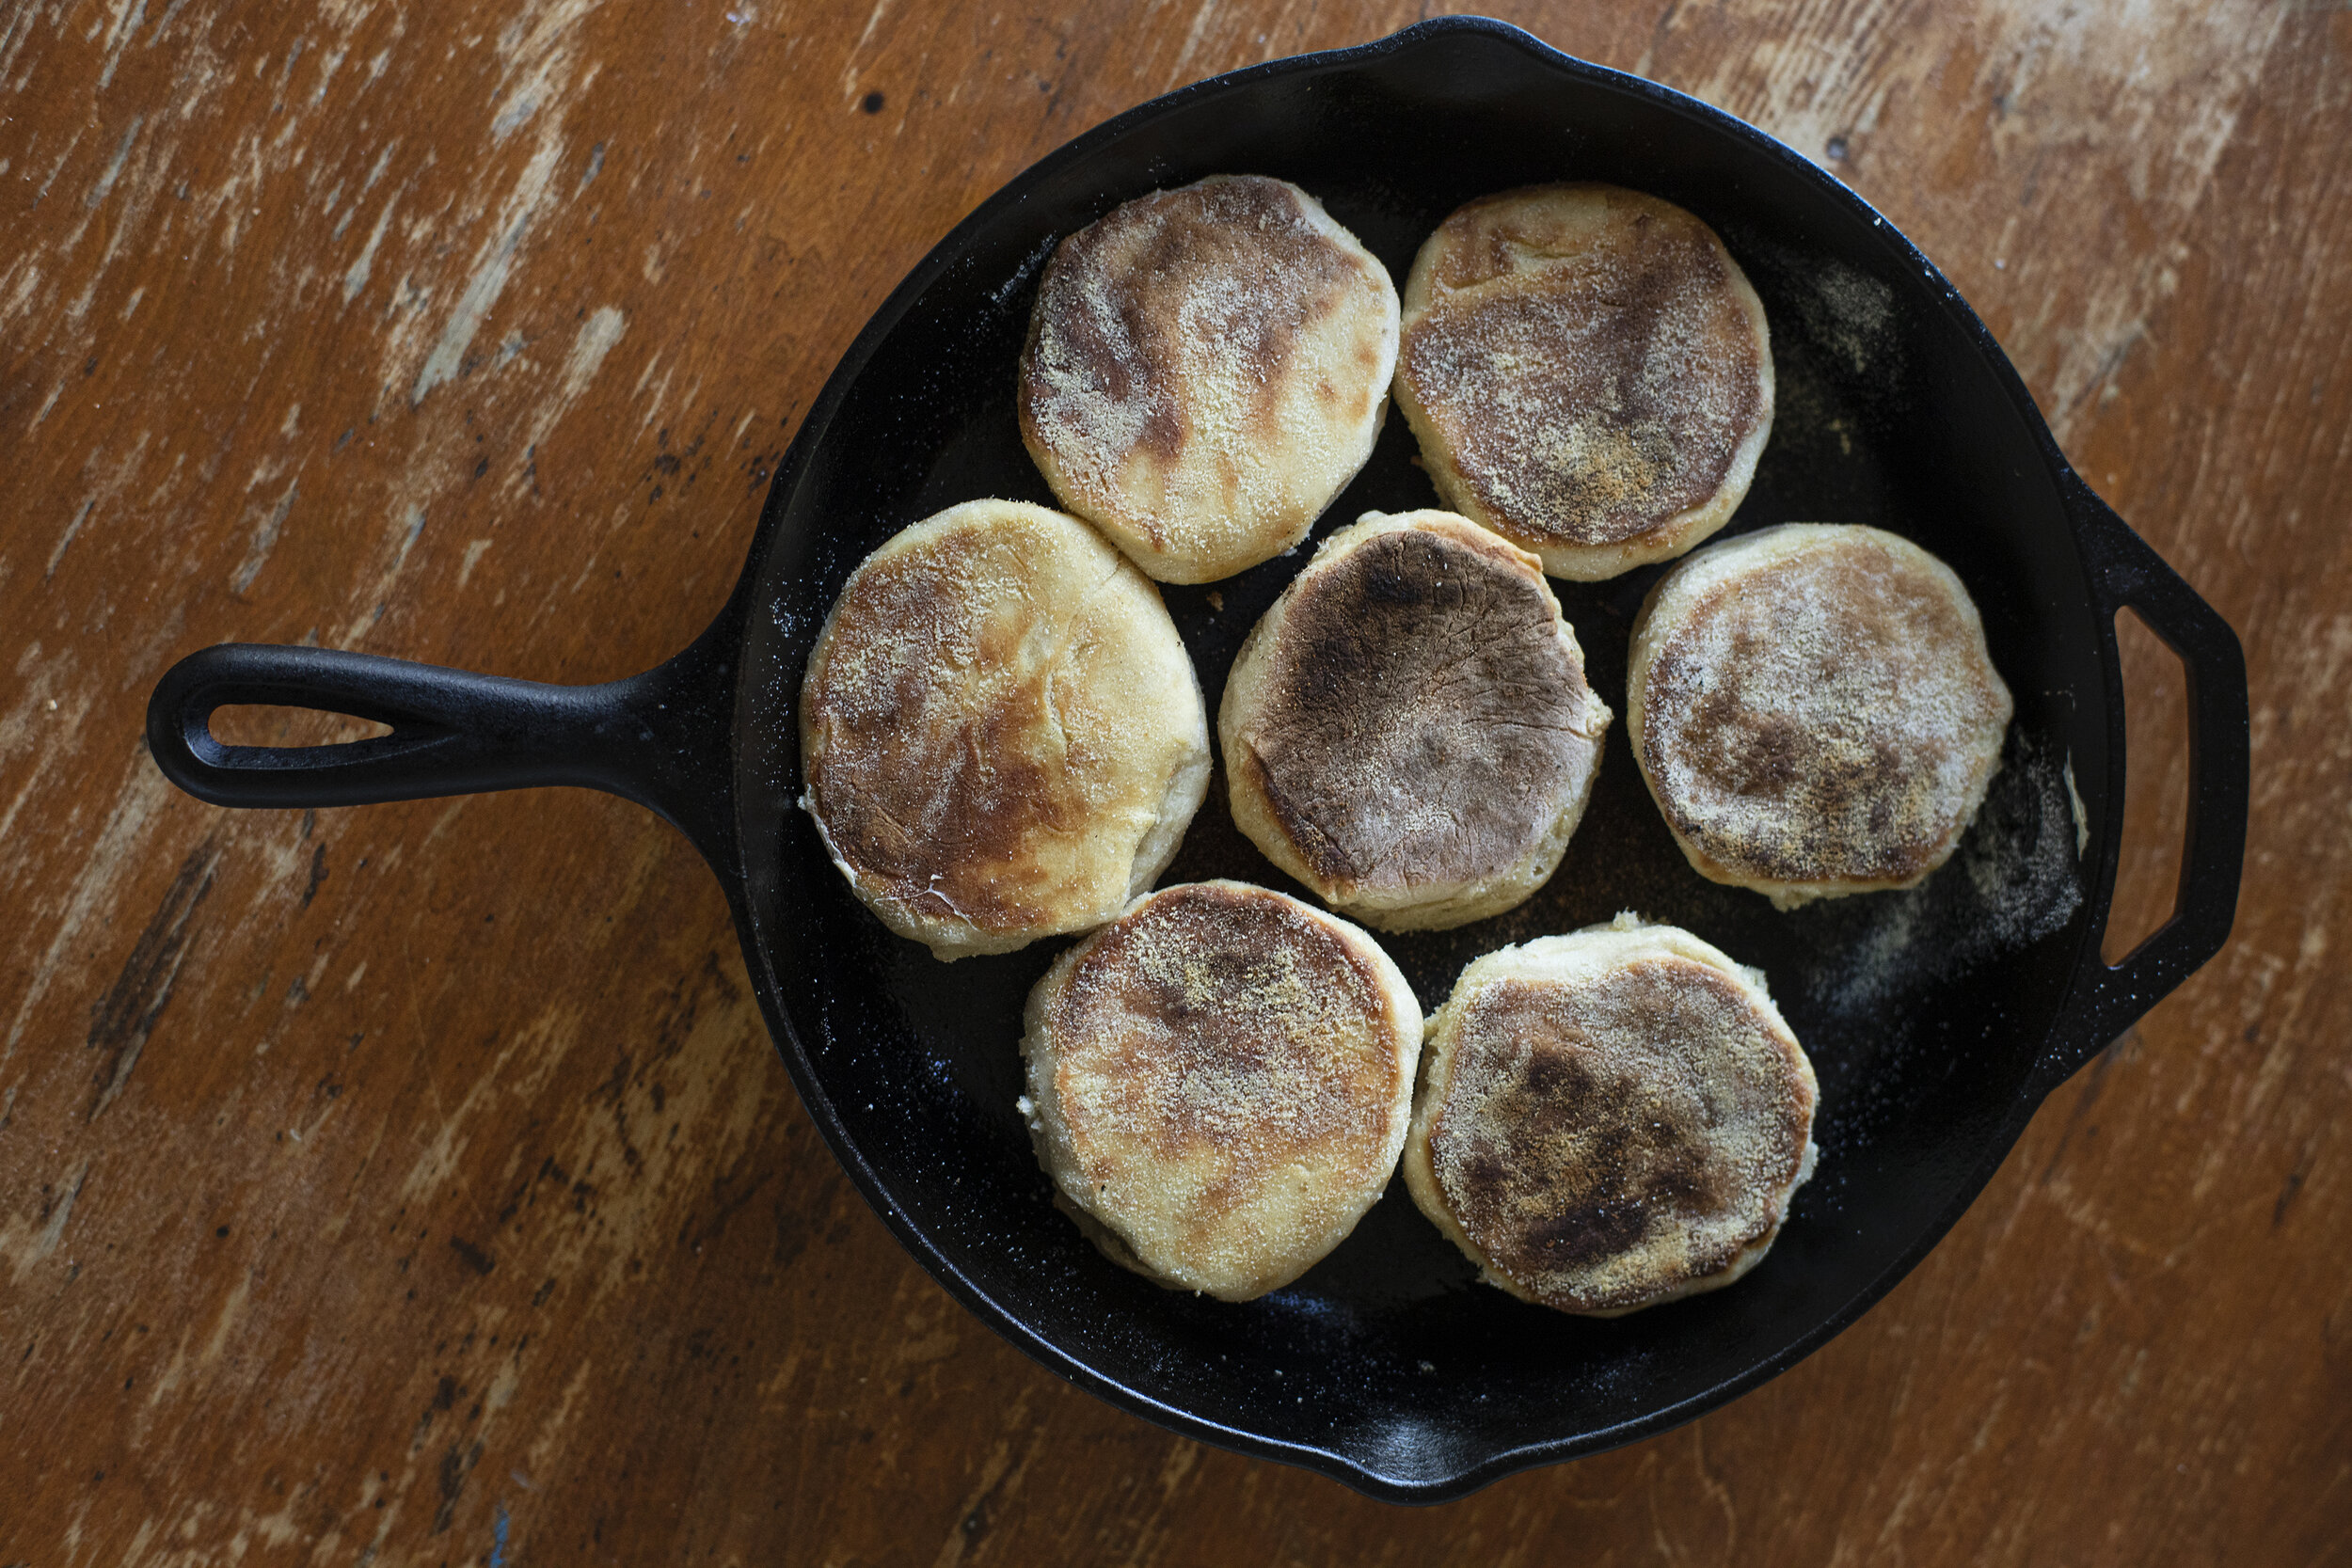
This might look like an ordinary breakfast sandwich, but this thing has a lot going on. Sweet and spicy venison + pork sausage patty, melted cheddar cheese, and a fried egg on top of a homemade sourdough English muffin. This is my version of Thomas’ English Muffin where I tried to replicate the textural experience with a naturally leavened dough. They’re super easy to make once you have an active starter and dare I say better than the original. Video of the process below.

The Sourdough English Muffins

Day 1 Evening

Make your sponge with 110 g active starter, 260 g bread flour, 276 g whole milk and set out to rest overnight at room temperature for approximately 8 hours.

hand in dough.jpg
punch outs.jpg
in skillet.jpg
crumb shot.jpg

Day 2 Morning

Add another 75 g bread flour, 1 tsp of salt, 1 tsp of baking soda, 1.5 tsp of honey, and 1.5 tsp of melted butter. Knead for about ten minutes until all the ingredients are well incorporated. Flour your working surface and roll the dough out to about half an inch thick. Using a circular form, punch out circles of the dough and dust them with a light coat of semolina. Set aside and let proof for about 45 to 60 minutes. 

Lightly oil a cast iron skillet and set to medium/low heat. Cook muffins directly in the pan for about 7 minutes on each side until golden/toasted brown. Cool on a wire rack and split open with a fork.

sausage ingredients.jpg

The Sausage Patties

   1 tablespoon finely chopped fresh sage

    1 tablespoon finely chopped fresh thyme

    2 teaspoons light brown sugar

    1½ teaspoons kosher salt

    1 teaspoon crushed fennel seeds

    ½ teaspoon crushed red pepper flakes

    ¼ teaspoon freshly ground black pepper

    ¼ teaspoon garlic powder

    ¼ teaspoon sweet paprika

    .5 pound ground pork 

    .5 pound ground venison

patties.jpg

Mix sage, thyme, brown sugar, salt, fennel seeds, red pepper flakes, black pepper, garlic powder, and paprika in a medium bowl. Add pork and venison and work spice mixture into meat with your hands until it's very well blended.

Using your hands, form approximately 3 - 4 inch patties about ¼ inch thick. Griddle sausage over medium-high heat until browned on one side, about 2 minutes. Flip and cook 2 minutes more. Use a grill press to ensure a thin and crispy patty.

open sandwich.jpg

The Sandwich

Lay your split English muffin open on a cast iron skillet and top with good quality cheddar cheese. Set into a broiler until the cheese melts. Meanwhile fry your egg in another pan with a generous amount of butter. Set the sausage patty on top of the melted cheese followed by the fried egg gently placed on top so it doesn’t break. Season with salt and pepper and the top half of the muffin. The sausage is already a little spicy but add hot sauce to your liking.

Le Casse Croute Tunisien

le casse croutte wide.jpg

Le Casse Croute Tunisien is a North African adaptation of the classic French sandwich of the same name. It basically translates to a hasty snack, something you’d find walking through the streets of Paris or in Tunis. On the Tunisian version you’ll find ingredients like hummus, olives, harissa, tuna and eggs. I’m experimenting with a new recipe for these seeded rustic mini baguettes pushing up to 80% hydration. The recipe is available here.

le casse croutte close.jpg

I’m still fine tuning this hummus recipe which I’ll post as soon as I feel like it’s ready. Next attempt will be made to produce a silkier end product.

hummus.jpg

Meatball Sub (With Venison)

This sandwich was inspired by Daniel Uditi, the chef over at Pizzana. My spin on the classic meatball sub was to swap out the beef with freshly ground venison from this year’s harvest. Since the venison is so lean I cut the blend with 50% ground pork to add some fat back into the equation. The meatballs were packed into homemade sesame rolls and finished off in a wood fired oven. Video showing the entire process below.

whole sandwich.jpg

The Meatballs

1 pound ground venison (or substitute with beef)

1 pound ground pork

2 cloves of garlic (finely minced)

¼ cup chopped parsley

1 cup of torn stale bread pieces, soaked in buttermilk*

¾ cup grated parmesan

Dried chili flakes (to your liking)

1 Egg

Salt and Pepper

Buttermilk

*I like to use any stale homemade sourdough bread I have laying around, but store bought works just as well. I like larger torn pieces as they give the meatball some airiness that you won’t get with the store-bought breadcrumbs. But if the pieces are too big, the meatball might begin to fall apart.

Stale bread soaking in buttermilk

Stale bread soaking in buttermilk

balls.jpg
browning.jpg

I brown my meatballs in a wood fired oven to give it a little smokey flavor but this can easily be done in a cast iron skillet. Brown all sides of each meatball and set aside as they cook. Once all the meatballs are browned, transfer them over to your simmering pot of red sauce and continue simmering (on low) for another 30 - 45 minutes until the meatballs are cooked all the way through.

in the sauce.jpg

This is my Nonna’s classic red sauce that I rarely deviate from. 

Stewed whole San Marzano tomatoes

Garlic

Yellow onion

Basil

Parmesan Rind

Salt

Pepper

Extra virgin olive oil

The key here is simplicity, and good ingredients (especially the tomatoes). Lightly puree the tomatoes in a processor or with a stick blender. Be careful not to aerate the tomatoes too much. For a chunkier sauce you can simply crush the tomatoes by hand. Set aside in a bowl. Peel and dice three to five cloves of garlic and set aside. Peel and chop the onion in half. By cooking the entire halves you will impart the flavor of the onion and the sauce won’t have chunks of onion in it. 

Heat a generous pour of EVOO in your saucepan at medium to low heat. Add your garlic and onion halves and let simmer for a few minutes. Be careful not to burn anything. Add a piece of parmesan rind into the hot oil, and let it simmer for another minute. The oils from the cheese will add depth to the sauce. Add your tomatoes to the pan, and bring to a simmer. Add salt and pepper to taste. My Nonna would often use a pinch of white granulated sugar just to add a little more sweetness but if you’re using good quality tomatoes this step is not necessary. Add some chopped basil, stir, and set on medium/low. You want your sauce to simmer for about 30 - 45 minutes. Stir frequently to make sure it's not sticking to the bottom.

melting cheese.jpg

Finishing Touches

I serve the meatballs (and sauce) on homemade sesame rolls that I’ve been iterating on this for the past year. That recipe can be found here. Slice each roll and open up like a book and set into a skillet or pan. Fill the entire surface with meatballs and ladle on a generous helping of sauce. Top with good quality buffalo mozzarella. Put the entire skillet back into the wood fire (or in your oven) until the cheese is completely melted. Remove from the heat, garnish with some fresh basil and your sandwich is ready to go.

two halves.jpg

Pani ca' Cori : Deer Heart Sandwich

This was the year that we lost my dad. It was also the year that I harvested my first deer after five years of trying. I grew up watching my dad hunt and was witness to the entire process from the forest, to the barn, and eventually to the dinner plate. He never forced it on me and as I became a teenager I grew disinterested. As an adult my appreciation of it returned along with my unease with concentrated animal feeding lots and the factory farm food system. But ultimately it was also a good excuse to get out in the woods with my dad as two adults even as I began to see his health begin to decline. He couldn’t come out the last two years but I persisted and kept him with me in my thoughts this season. I know he’d be smiling right now. This animal will be appreciated in the fullest sense of the word and I hope to transmit a sense of respect and responsibility that comes with it to my own two boys.

deer heart sandwich.jpg

The first meal I wanted to make was a tribute to my dad and his Sicilian origins. Pani ca' Meusa is a Sicilian sandwich traditionally made with stewed organ meats that get cooked over a long period of time in giant pots. It has become one of the most iconic foods in Palermo served at a handful of old school street vendors throughout the city. You’ll find them smothered in freshly grated caciocavallo cheese and served with a squeeze of lemon. The offal is typically spleen and lungs of a cow. Originally this was a sandwich designed for the poor but eventually, like other culinary feats of frugality and ingenuity, it has become widely popularized thanks in part to food fanatics like Palermo Street Food.

deer in snow.jpg
heart in the snow.jpg

For months leading up to this year’s deer hunting season I had been dreaming up different recipes in anticipation. I didn’t want anything to go to waste. What came to me was a spin on the classic Pani ca' Meusa but instead of using the traditional offal I would instead focus the sandwich on the deer heart. The heart was broken down into several beautiful steaks which were marinated with olive oil, garlic, homemade plum vinegar, salt and pepper. I then grilled them quickly on a hot grill and sliced them super thin, smothered them in grated caciocavallo from Jersey Girl Cheese and delivered them on my homemade sesame sourdough rolls. The concept, which I’m calling Pani ca' Cori, is distinctly Sicilian but it takes on new meaning with the notable addition of the deer heart. Video of the whole process below.

sesame rolls.jpg
grilling.jpg
dad with deer.jpg

My dad in the 80’s.

Porchetta sandwich with salsa verde

porchetta sandwich 1.jpg

This was my first trial of an oven roasted porchetta sandwich with salsa verde, grated caciocavallo, on a sourdough sesame roll. Local cheese from Jersey Cheese and pork sourced from NK Prime Meats. There are definitely a few tweaks to be made on future iterations but overall pretty satisfied with version 1.0.

You’ll find countless porchetta recipes that all use different cuts of pork (from pork shoulder to pork belly) but the traditional method uses a large section of pork belly with the ribs removed and the loin still attached. If you can’t find a butcher who can prepare this more specialized cut for you, a compromise would be taking a skin-on cut of pork belly and a piece of pork loin, and working backwards to recreate the original cut. In the video below, you can watch the exact process of how the meat was broken down and rolled together with a blend of aromatics.

filling aromatics.jpg

The filling:

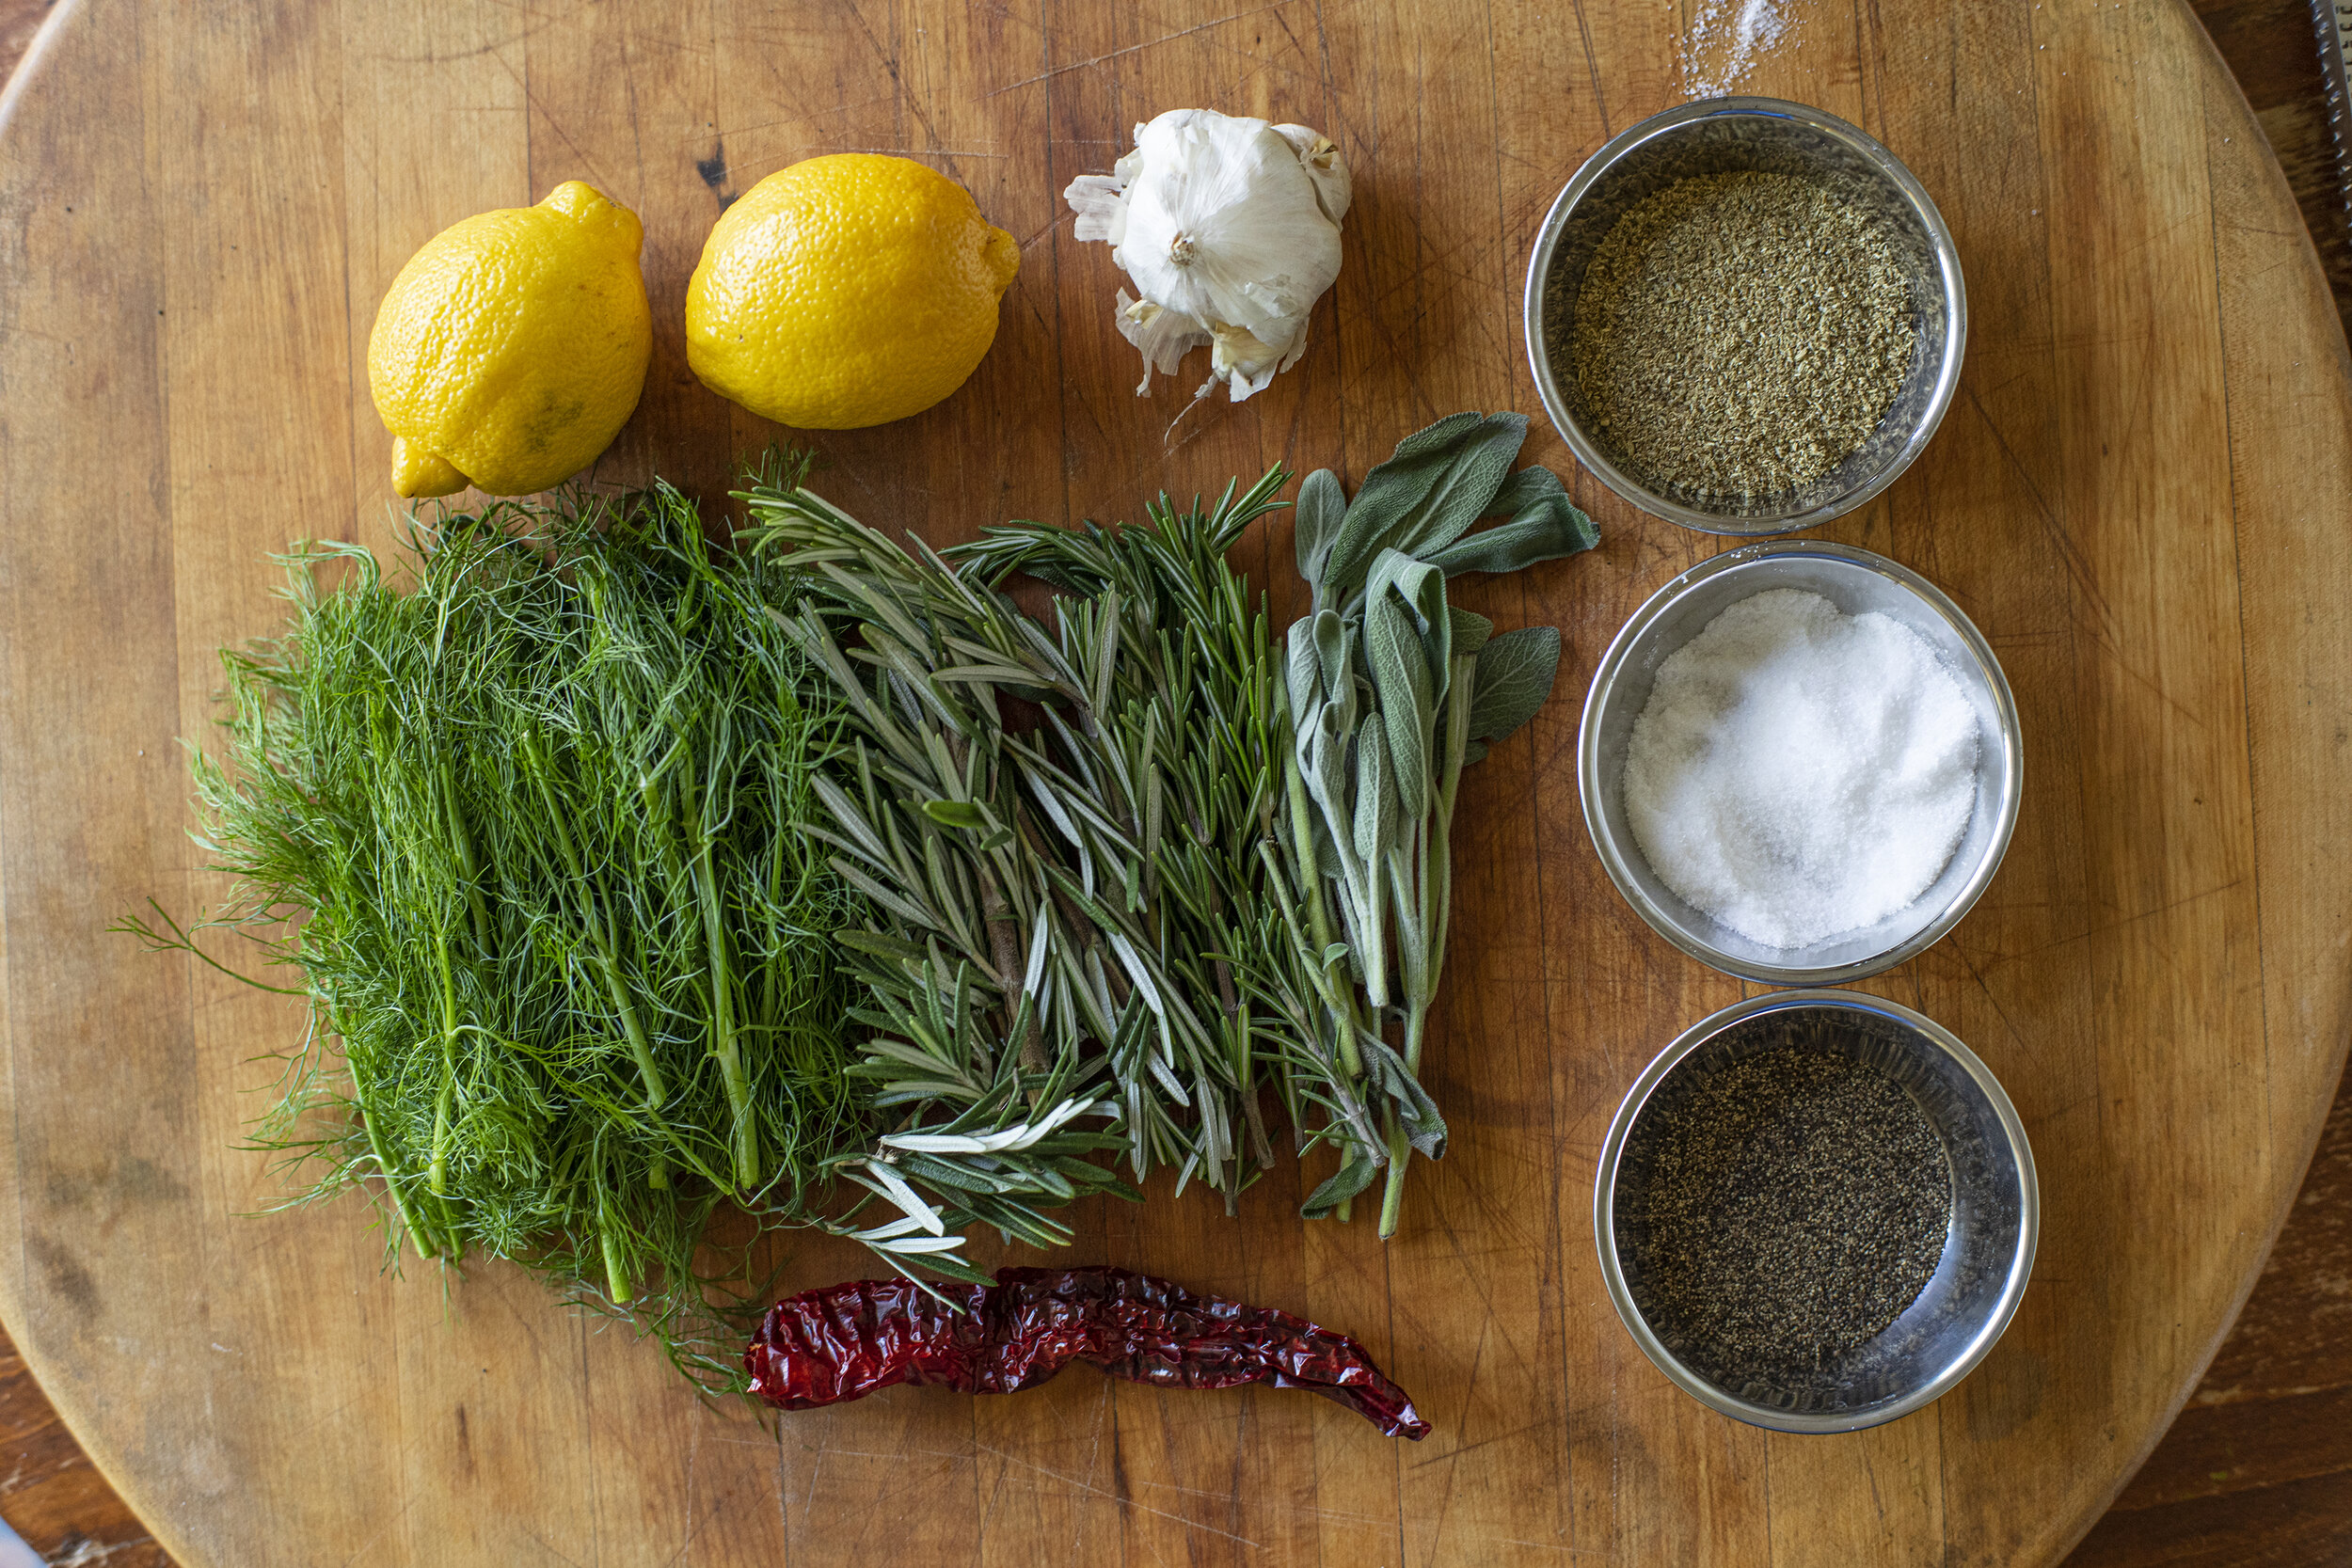
Finely dice fennel fronds, rosemary, sage, and garlic and mix together in a medium size mixing bowl. Add dried & crushed hot chili flakes to taste. Add zest of one lemon. Add 2 teaspoons of dried fennel seed powder, salt and pepper. Add oil oil so the entire mixture comes together like a thick paste. 

belly rub.jpg

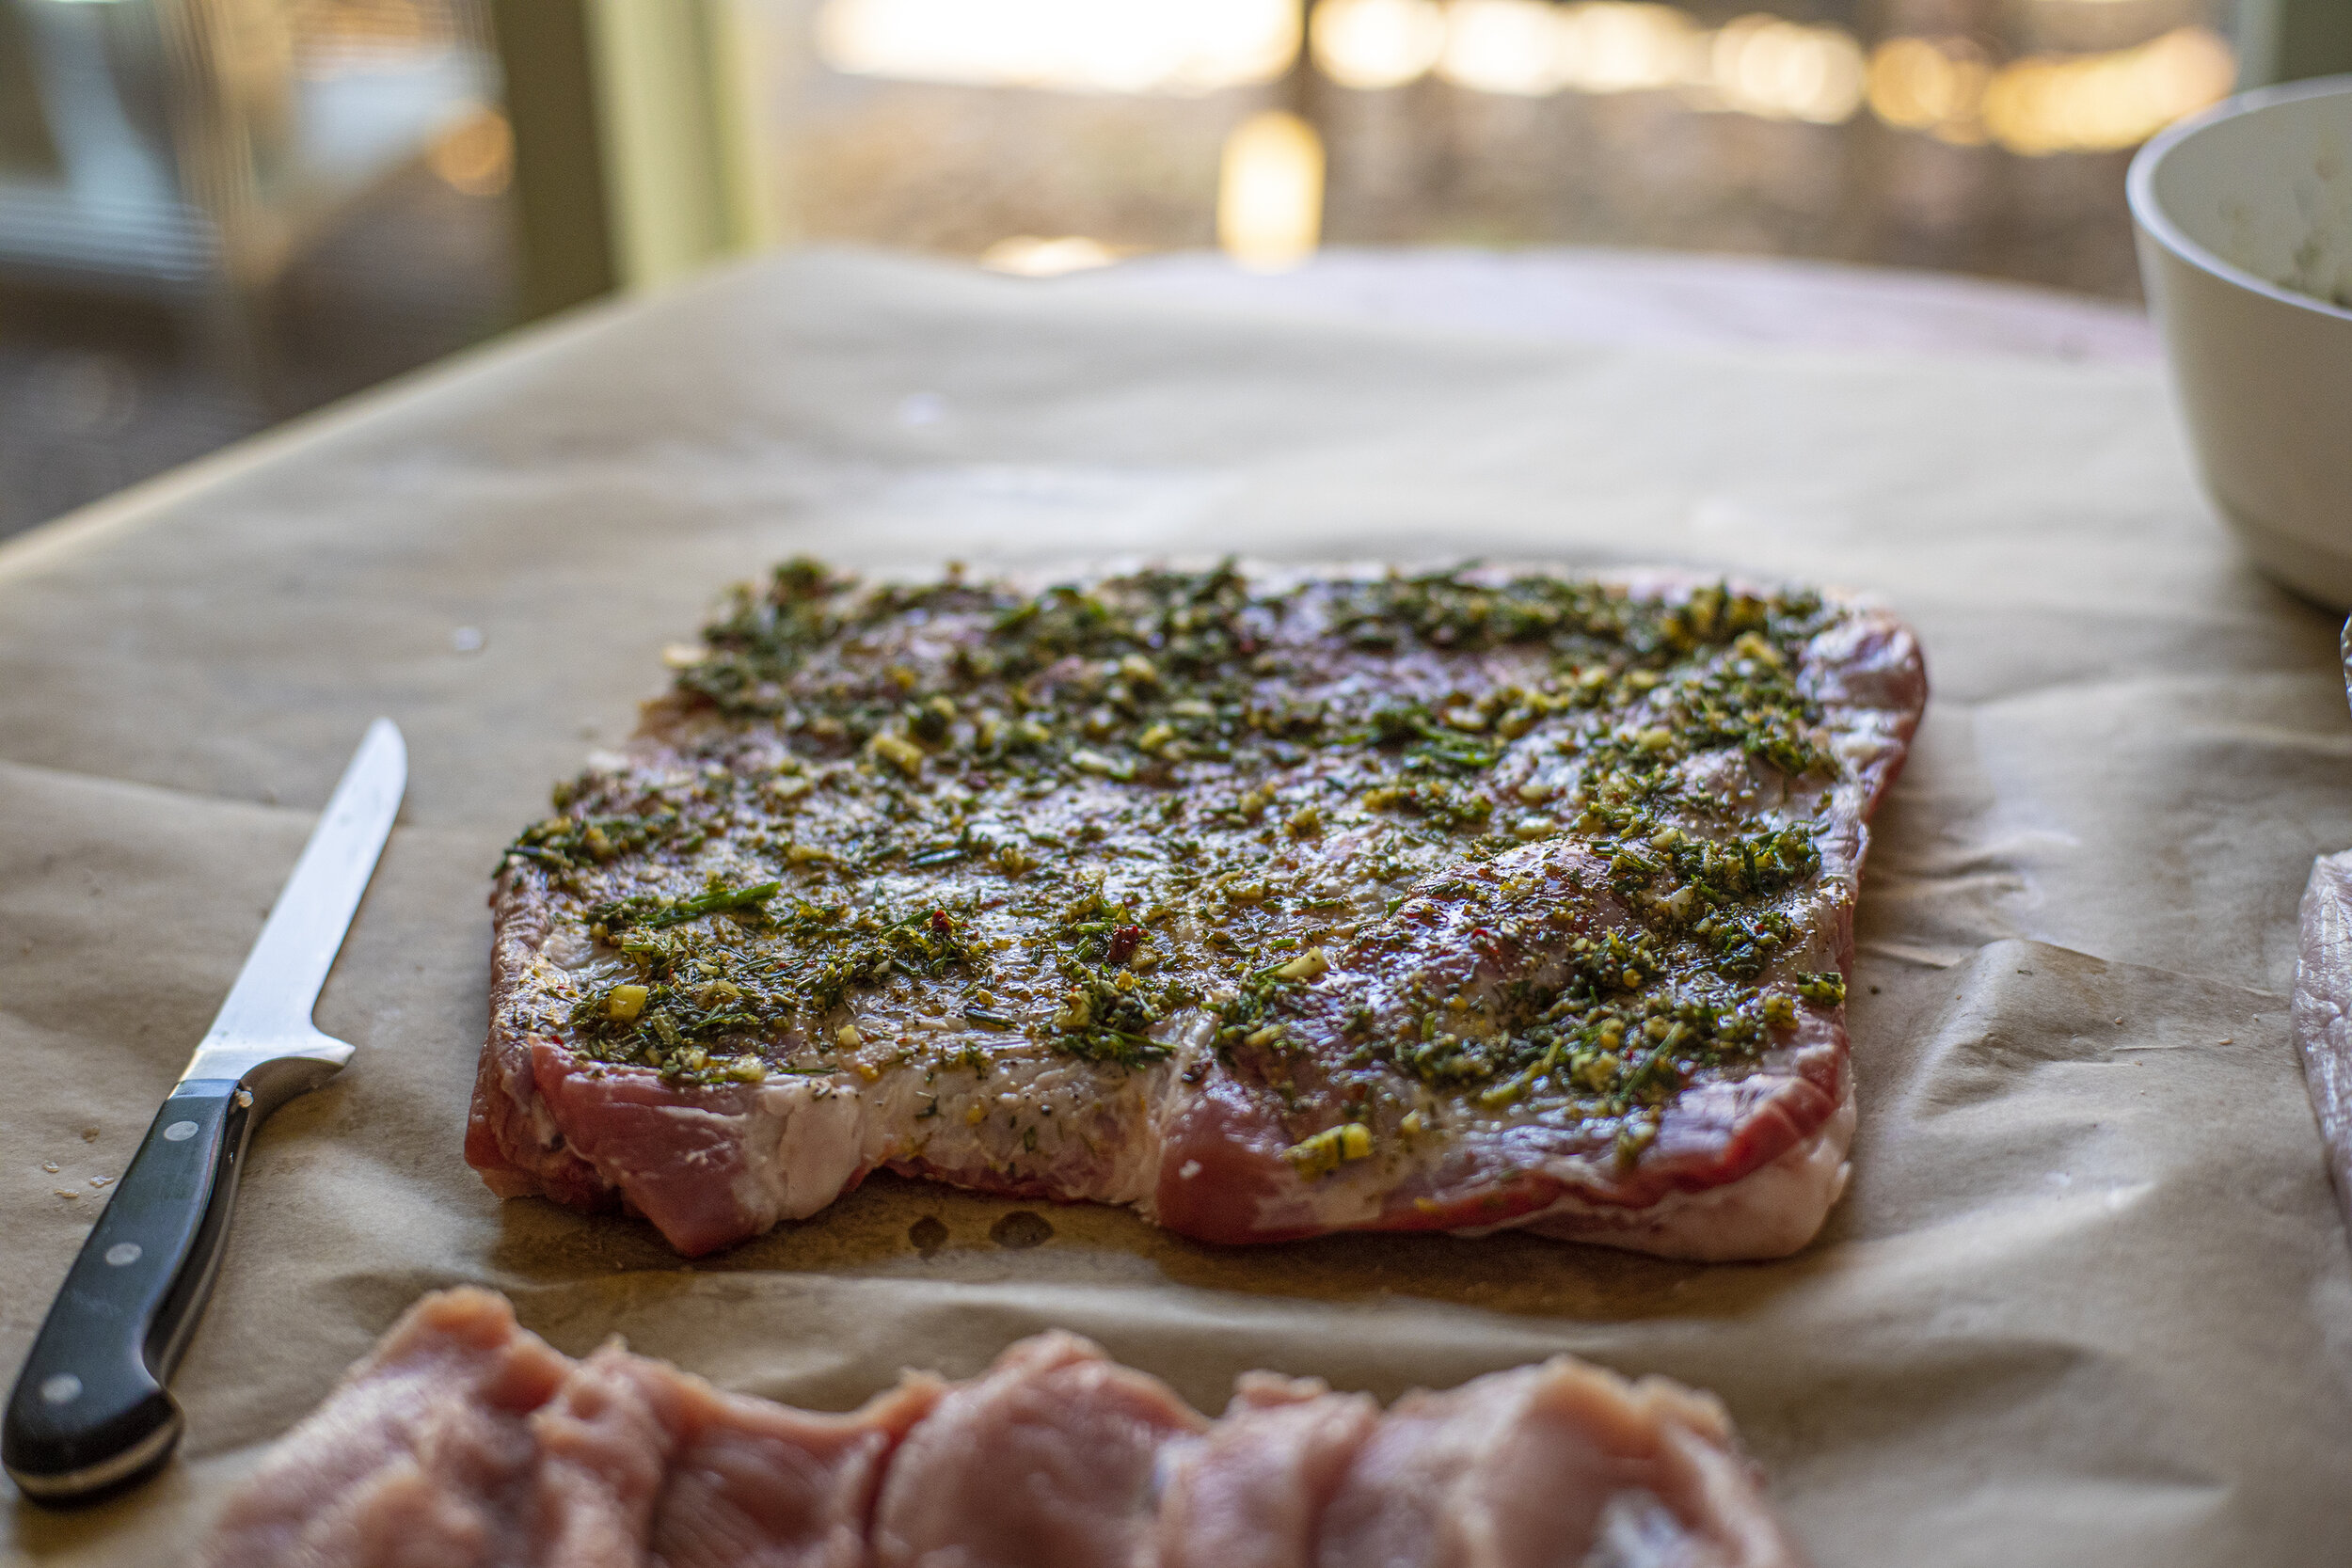
Remove the skin from the belly and set aside for later. Next cut the loin to the exact size of the belly and butterfly it open to maximize the surface area of the meat. Set the loin piece aside and spread the aromatic filling all over the surface of the pork belly, fat side down. Lay in the butterflied loin piece and generously spread more of the filling all over the meat. Carefully roll up the belly and loin and position with fat side facing up. Rub more paste all over the top before laying on the piece of skin that was previously removed. 

trussed up.jpg

Using butcher's twine, you want to carefully truss the porchetta every few inches so that the whole piece is secure during cooking. Using a sharp boning knife, make small punctures all over the surface of the skin so that the fat renders out during cooking. Wrap porchetta and refrigerate for 6 hours to overnight. Allow to sit out at room temperature before putting it into the oven to allow the meat to relax, yielding a more tender piece of meat.

Roasting:

Set porchetta into a roasting pan with rack to keep the meat elevated during cooking. Cook for 40 minutes at 475F before lowering the temperature down to 300F for another 2 - 4 hours until the internal temperature reads 155F. The skin should puff up as it cooks and result in an airy, crispy texture. If skin still feels rubbery, use the broiler (with a very careful eye not to burn it) to finish off the skin before removing from the oven. Allow the meat to rest 30 minutes before slicing. 

Salsa Verde:

Using a food processor, blend together two bunches of parsley, garlic, a few spoonfuls of capers, 3 fillets of anchovies, juice of one lemon, a few splashes of white vinegar, and a few glugs of olive oil.

porchetta sliced.jpg

Porchetta Sandwich:

Slice porchetta in thin slices and set aside some of the crispy skin. Layer meat on a freshly baked sourdough sesame roll (recipe here) and top with salsa verde and freshly grated caciocavallo cheese (or provolone).  

sourdough rolls.jpg

"The Rockaway" Frittata Sandwich

Over the past few years I’ve been collecting food memories from my parents with the hopes of preserving them before they disappeared. One particular story from when my mom was a girl growing up in Brooklyn recently stood out to me as something I needed to explore further. Video is below.

D42A5822.JPG

“The trip out to Rockaway Beach was always by train. We took the L to Myrtle Ave where we transferred to a train to Jamaica Station. There we transferred again and took another train over the causeway. The long rides were always fun, hopping around with our friends. I tagged along with my older sister Josephine who was ten years my senior. We would pack the leftover frittatas from the night before and would be the envy of all the friends with their plain old bologna sandwiches.”

old photos.jpg

Today a bacon, egg, and cheese on a round roll is one of the more ubiquitous breakfast sandwiches in the Northeast. Through the memory my mom shared, and the reimagined sandwich that followed I somehow arrived back at that classic combination - and dare I say made it even better. This version was a pepper, potato, scallion, bacon and cheese frittata served on a pillow of thick focaccia with flaky sea salt and will definitely be repeated.

The Fritatta:

All of the ingredients should be precooked before the introduction of the eggs. This will ensure everything is tender and perfectly cooked when you remove it from the oven.

If using potatoes, break them down into small pieces and boil for a few minutes. Drain them and let them air out for a few minutes while you work on something else. Once they’ve lost a lot of their moisture, I saute them in olive oil until crispy and set aside.

Mix together all of the cooked ingredients in your skillet and bring up to medium heat. Sprinkle in shredded cheese over the entire mixture. Pour in your mixed eggs so it covers the entire surface. You’ll need to use your best judgement depending on the size of your pan and the amount of ingredients you’re using. Sprinkle more cheese on the top of the entire surface. Bake in the oven at 375F for 20 minutes, or until fully cooked through in the center. You can finish it off by crisping it up under the broiler for another minute or so.

bottom.jpg

The focaccia recipe was an adaptation of the sesame sourdough rolls I have been making recently, with increased hydration. Recipe can be found here. You can really dress the sandwich up with anything but I like the combination of spicy aioli and baby arugula. Crumbled sausage also works really well as an alternative to the bacon.

bread slicing.jpg
fritatta edge.jpg
mom with sandwich.jpg

Shredded Short Rib Sandwich on Wood Fired Sourdough Roll

Growing up in a home of Sicilian immigrants my food experience was very much influenced by the traditions that my parents and grandparents brought with them to America. Rustic and at times unusual foods that were part of my daily life. There were also instances where the Italian and American influences came crashing together in delicious ways.

short rib sandwich.jpg

I have vivid memories of standing around the kitchen watching my Nonnas prepare red sauce and anxiously waiting for them to make me a sauce sandwich - which simply, is a big ladle full of hot sauce slathered on a piece of Wonder bread and topped off with another slice. The weight of the sauce would practically dissolve the flimsy pieces of bread but it was always one of the most satisfying bites of food that I can remember. It’s kind of the perfect representation of my entire food experience.

ribs in fire.jpg

This sandwich is my homage to them, a sauce sandwich made with a deep and decadent 5 hour meat sauce with shredded short ribs, topped with grated caciocavallo, basil, and served on a wood fired sourdough roll. This is serious business.

ribs in sauce.jpg
wood fired.jpg
crumb.jpg

Panelle Sandwich on Rustic Wood Fired Sourdough

Panelle is one of those iconic street foods that is ubiquitous in Palermo. Chickpea flour, seasoned with salt, pepper, olive oil, and parsley. Fried quickly until crispy and served with fresh squeezed lemon, sometimes in the form of a sandwich. It’s so simple and yet feels exotic. This version was served on top of a rustic wood fired sourdough bun baked in the Ooni Pro along with charred lemon. Video about the process below.

panelle sandwich 1.jpg
charred lemon.jpg

Lemons charred right in the coals of the oven.

rustic buns.jpg

The sourdough buns were wood fired at approximately 425F for 20 minutes. Temperature regulation remains a challenge in the wood fired oven. For more consistency a traditional convection oven works great.

Nashville Hot Chicken of the Woods

Experiments in the mushroom lab. This is a play on the classic Nashville Hot Chicken sandwich where I’ve replaced the chicken with wild Chicken of the Woods mushrooms. After finding a perfect early season Chicken of the Woods I spent several months thinking about this idea. Weeks went by without finding any more good specimens. I was always a few days too late. Finally I came across a small grouping of laetiporus sulphureus right when I was feeling most defeated. Video about the process below.

sandwich 2.jpg

It was prepared in the same way that you would use real chicken, battered in a mix of flour, salt, pepper, buttermilk, and homemade one-year vintage fermented hot sauce. Deep fried at 350F and slathered with rendered duck fat, paprika, garlic powder, cayenne, and brown sugar. Then it’s layered onto homemade sourdough buns and topped with butter pickles and red slaw. 

sourdough buns.jpg

The buns are a work in progress but getting closer to the softness and texture that I’m looking for.

pickles and slaw.jpg

The butter pickles and the coleslaw both used a homemade perry vinegar which is aromatic and on the mild side.

hot sauce mash.jpg

The hot sauce I used was from a 2018 batch of fermented chilies and garlic. After being milled it’s blended with 50% white vinegar and stored in the refrigerator. Each year I use a slightly different combination of peppers but this year I’m growing Cornito Rossos, Paper Lanterns, and Arapahos.

chicken spread.jpg
chicken on tree.jpg

Overall, it wasn’t a bad first attempt but it definitely needs some work. After getting a lot of feedback on the recipe it seems like the mushrooms should be water-sauteed briefly before they are battered and fried to reduce the amount of retained oil and to make the interior more tender. Definitely a suggestion that I will take into consideration next time around.