Same-Day Sourdough Flatbread

The beauty of this recipe is how versatile it can be. Start it in the morning and you’ll have flatbread for dinner. It can be baked on a pizza stone, or straight in a buttered cast iron skillet. It can be spiced or left plain. The possibilities are really endless and it can conform to whatever meal your making.

baked flatbread.jpg

The Dough

Morning (Around 7am):
Mix together 95g active starter, 2.25 cups all purpose flour, 1 cup warm water, .5 tsp salt and spices if you’re using them. For Indian style flatbread I use .5 tsp tumeric and .5 tsp cumin. Mix well, cover and leave out at room temperature all day.

Afternoon (Around 4pm):

Dust your work surface with flour. Dump out dough and divide into 5 equal balls. Do a quick stretch and fold of each ball to shape as if you were shaping pizza dough. Proof for another 20-30 mins.

On floured surface, one by one, press each ball of dough down with your fingers, gently pulling the edges so it flattens out to about .25 inch. The process is very similar to shaping pizza dough.

Baking in the Oven:

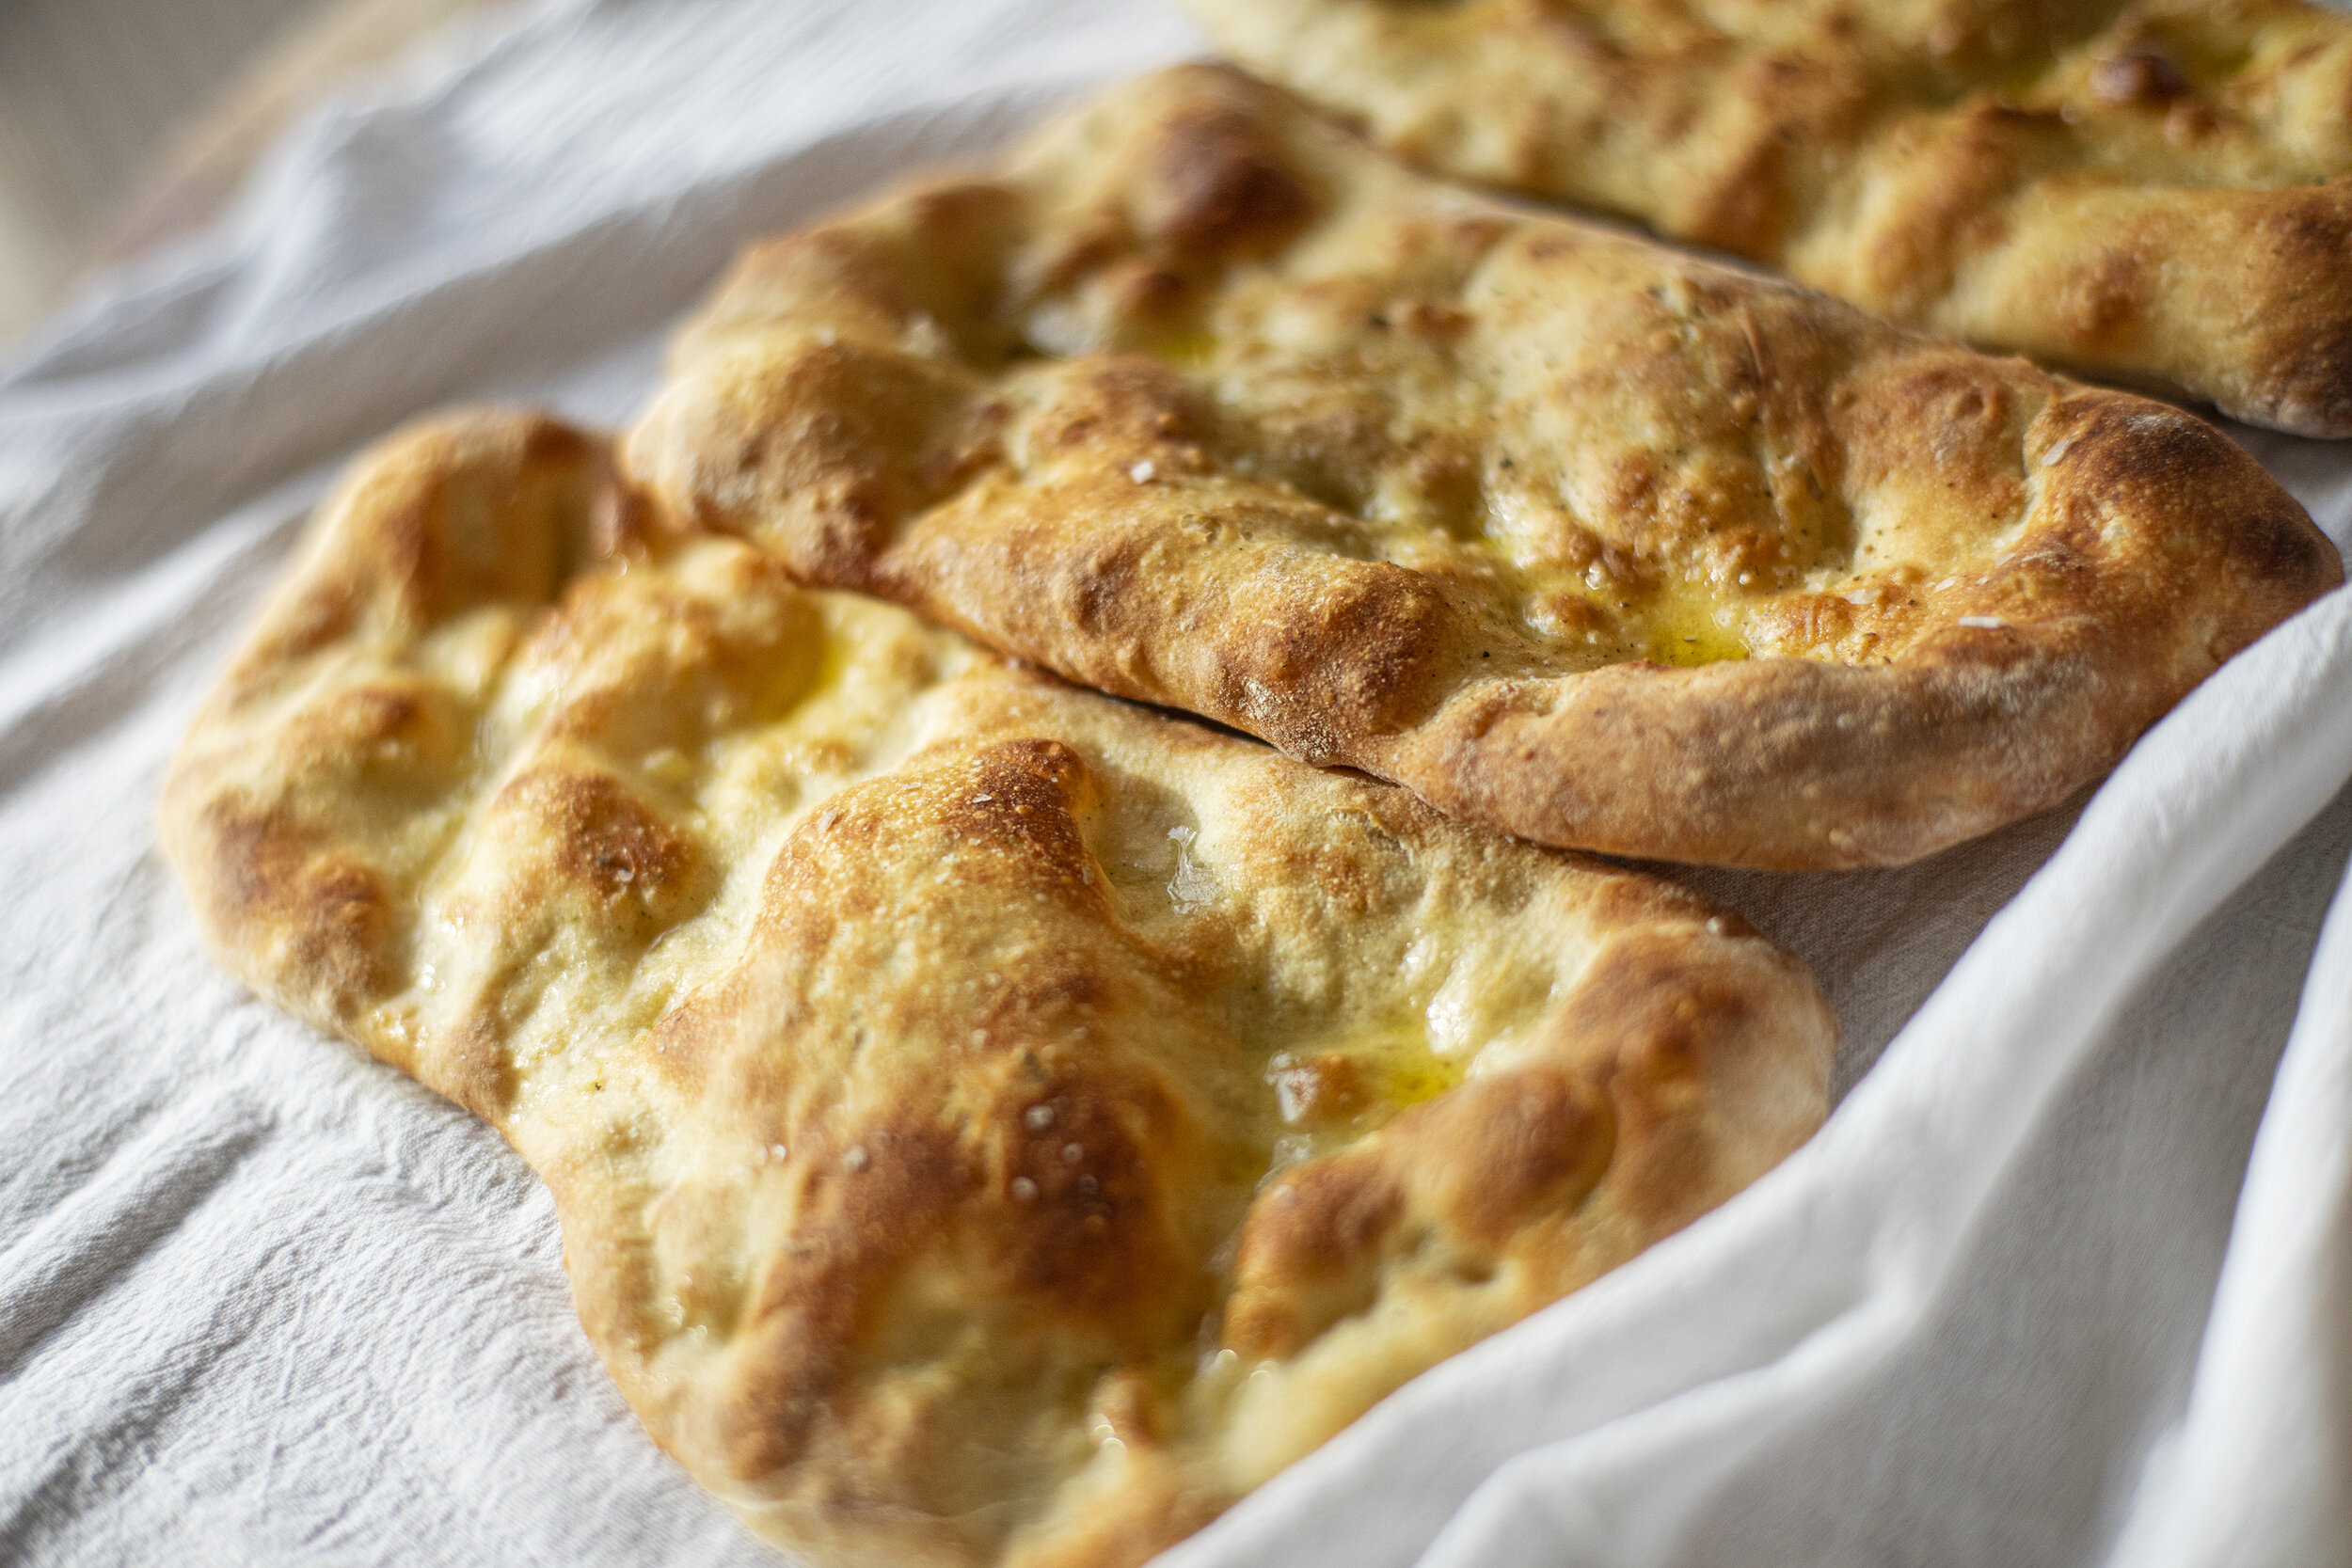
Heat your oven / pizza stone to 500F. Brush each dough with a little olive oil and sprinkle with salt. Using a pizza peel, slide in as many individual doughs as will fit. Bake for about ten minutes, until golden brown and puffy. This method will yield slightly puffier flatbread than the cast iron method.

Baked flatbreads with shakshouka.

Baked flatbreads with shakshouka.

Baking in a cast iron skillet:

Heat up cast iron pan and add a pat of butter for each flatbread you make. Lay down the flatbread in the hot pan and cook for about 5 minutes on each side until it begins to puff up and get blistered in the heat. Some char marks are welcomed here. Make sure to thoroughly clean out the skillet in between each piec

Skillet cooked flatbread, spiced with tumeric and cumin, dusted with ramp powder.

Skillet cooked flatbread, spiced with tumeric and cumin, dusted with ramp powder.

Seasonal Spring Sea of Green Pie with Ramp Dust

I drew some inspiration from @danieleuditi at @pizzana with his use of dehydrated basil. This time of year in the northeast, ramps (allium tricoccum) are in their full glory. If you know where to look, you'll find vast hillsides of vibrant green ramps. I wanted to make a seasonal pie that pays tribute to this incredible woodland ingredient. I harvested just the tender leaves of the plant, leaving the bulbs in the ground, and made a dehydrated ramp dust that is central to this pie. The powder retains the most amazing deep green color so we decided to call it the Sea of Green. Fired in my @oonihq Pro. Video of the whole process below.

whole pie.jpg

Just a reminder to harvest ramps responsibly. Don't yank the bulbs or harvest more than you need! It takes seven years for ramps to reach maturity from seed.

ramps on log.jpg

Once you have your fresh ramps, I like to trim the stems off so you’re only drying the green leafy section of the plant. The stems are great as a pickled condiment, which can get eaten as is or processed into salad dressing. Any of your favorite pickling recipes will be great for the stems.

IMG_7407.jpg
ramp leaving ready to dry.jpg

Place the leaves in the dehydrator and it should take about 2 - 3 hours until the leaves are fully dry. When done, they should be brittle and break apart in your fingertips.

crumbles.jpg

In a bowl, crush the leaves with your hands to break them down to a smaller size. You can use a mortar and pestle to break down further or just skip ahead and blitz everything in a spice grinder to create a fine powder. You’ll be left with an amazing green colored dust that you can store by itself or mix it 50/50 with salt to make ramp salt. The raw ramp dust is extremely versatile and can be used to spice meat, vegetables, fused into sauces, etc.  I keep a jar of it in my spice cabinet and I store the rest in the freezer for future use. Like any spices, it will lose its potency over time.

green dust.jpg

For the pizza I have been very happy using a Ken Forkish recipe from Flour Water Salt Yeast for an overnight dough with levain. It’s one of the few recipes that I have decided not to mess with as it always yields great results.

dough balls.jpg

The foundation of the pizza is a plain pie, with a parmesan laden red sauce, shredded mozzarella cheese and a drizzle of olive oil. The pie comes to life with a generous dusting of the ramp dust all over the top of the pie, followed by fresh basil leaves. It’s subtle and delicious.

slice of sea of green.jpg

Poppy Seed Rye Sourdough

Mix together 410 g of water, 360 g of bread flour, 85 g of whole wheat flour, 85 g of rye flour and set to autolyse for up to six hours. Add 15 g of salt, 7 g of cracked caraway seeds, 7 g of poppy seeds and 90 g of active sourdough starter and start working into the dough with your hands or with a rubber spatula until more or less homogenous. Let rest for 45 minutes. You’ll want to stretch and fold the dough two more times (with your hands) over the course of the next 1 - 2 hours to develop the gluten. By the end the dough should be very smooth and should not stick to your hands while folding. Cover and rest overnight at room temperature.

poppy seed rye.jpg

In the morning transfer the dough to a clean working surface lightly dusted with flour. Fold the dough one final time and shape while being careful not to degas. Gently roll the dough into another bowl of poppy seeds. Transfer into banneton, cover and let rise for 2 - 3 hours.

poppyseed rye crumb.jpg

Set oven to 475F with dutch oven inside to heat up. Transfer the dough to a peel with parchment paper and slip it into the heated dutch oven. Using a bread laim, score the top of the dough. Bake for 25 minutes with the lid on and 20 more minutes with the lid off. Remove from the oven and allow to cool before slicing.

Sourdough Ciabatta

My first attempt at ciabatta was a total disaster. I decided to start from scratch and completely rethink the recipe. Second time around I think I nailed it. Beautiful open crumb and wonderful flavor.

holding up crumb.jpg

450 g water

53 g whole wheat flour

477 g bread flour

90 g active starter

15 g salt

18 g olive oil

*yields two medium size loaves at 85% hydration

Step 1 Autolyse - 2pm Day 1

Mix together 400 g of water and 530 g of the combined flour. Make sure there are no clumps, cover and set to autolyse for up to six hours. Note that you are reserving 50 g of the total water for the next step.

Step 2 Bassinage Technique - 7pm Day 1 

Because of the high hydration, a stand mixer makes this process quite a bit easier. You can mix by hand but it doubles the amount of time it takes to develop the gluten. 

Combine the autolyse mixture, 15 g of salt, 90 g of active sourdough starter, and 18 g of olive oil into your mixing bowl. Lower the hook attachment into the bowl and start it at the lowest setting for a few minutes. Very slowly add in the remaining 50 g of water. At this point you may begin to question whether or not it’s going to work but stay the course and the dough will start forming structure. Increase the mixer speed and continue to add water slowly. Increase the speed again. Total mixing time will take about 10-15 minutes. You’ll notice that with patience, the dough begins to form a ball and will start slapping against the sides of the bowl. Transfer the dough into a large mixing bowl or container.

Step 3 Additional Folding - 7:15pm - 9:00pm Day 1

You’ll want to fold the dough three times (with your hands) over the course of the next 1.5 hours to develop the gluten. By the end the dough should be very smooth and should not stick to your hands while folding. It will remain very wet but it should pass the windowpane test. Cover and rest overnight at room temperature. 

in couche.jpg

Step 4 Proofing - 7am Day 2

Uncover the dough and generously flour the surface. Gently pull the edges of the dough back from the sides of the container allowing flour to rolls down along the edges. Turn the container over onto a floured surface and divide the dough into two halves. The key now is to touch the dough as little as possible. Gently shape each half into rectangles and transfer them onto a well floured couche. Any clean kitchen linens will work if you don’t own a baker’s couche. You’ll want to make sure there is a barrier between the two doughs as they proof. Give another dusting of flour to the top of the dough and cover with another couche or kitchen linens. Allow to proof for another 2 - 3 hours.

Step 5 Baking - 10am Day 2 

Your oven should be set to 450F with a heatproof bowl of water on the rack to create steam. The next part can be a little tricky and you may need to improvise depending on the type of tools you’re working with. Now it’s time to get your proofed dough off of the couche, onto a peel or board, and into the oven. As long as you have floured the couche and dough liberally you shouldn’t have any issues with the dough sticking. Because of the high hydration you’ll need to work somewhat quickly and confidently. Now you’ll flip each dough off of the couche and onto your launching tool in one clean motion so that the bottom now becomes the top. I like to use parchment paper for this stage as well. For this recipe, both doughs should fit on a medium sized pizza peel and will bake directly on a stone in a medium sized conventional oven. Bake for 20 minutes with the steam and lower the temperature to 425F. Remove the bowl of water and baker for another 20-25 mins until golden brown and well risen. Remove from oven and allow to cool before slicing. 

ciabatta on counter.jpg
crumb close.jpg

Whole Wheat Oat Bran Seeded Sourdough

seeded WF baguettes.jpg

Mix together 430 g of water, 424 g of bread flour, 106 g of whole wheat flour and 15 g of oat bran and set to autolyse for up to six hours.  Add 15 g of salt and 90 g of active sourdough starter and start working into the dough with your hands or with a rubber spatula until more or less homogenous. Let rest for 45 minutes. You’ll want to fold the dough two more times (with your hands) over the course of the next 1 - 2 hours to develop the gluten. By the end the dough should be very smooth and should not stick to your hands while folding. Cover and rest for about 10 hours at room temperature. For timing, I normally will aim to start mixing in the salt and active starter around 7pm. By 9pm I leave it alone for the bulk ferment at room temperature.

In the morning (around 7am) transfer the dough to a clean working surface lightly dusted with flour. Divide the dough into 4 - 6 equal parts depending on the size and shape of the rolls you’re making. Shape each piece being careful not to degas the dough. Gently roll each dough into a mix of seeds. I like to use golden flax, sesame, and poppy seeds. Cover and let rise for 2 - 3 hours. 

Set oven to 450F. Using a bread laim, score each dough. Bake for 20 - 25 minutes with a heat proof bowl of water in the oven to create ambient moisture. Remove rolls from oven and allow to cool before slicing.

This recipe also works really well for a larger loaf which I bake in a Dutch oven t 475F for 20 minutes with the lid on and 20 minutes with the lid off. See below.

seeded loaf from top.jpg
seeded loaf crumb.jpg

Detroit Style Sfincione Pizza

I’ve been in a focaccia / pan pizza kind of mood recently and decided to give a go at a hybrid of a traditional Sicilian Sfincione and a classic Detroit pizza. It’s really the best of both worlds where the salty umami punch of the sfincione meets the crispy caramelized crust of the Detroit pizza. Short video about the process below.

detroit sfincione.jpg

The dough is an adaptation of my focaccia recipe (link here) where I have increased the hydration by 2%.

before bake.jpg

Ingredients:

2 large onions 

6 drained, peeled, crushed tomatoes from can

Grated parmigiano or fresh diced caciocavallo

Anchovy fillets mashed into small pieces to taste

Dried oregano to taste

Olive oil

Toasted breadcrumbs preferably coarse

Salt and pepper

Pizza dough

Directions:

Oil a rectangular pizza pan liberally. Line the edges of the pan with shredded mozzarella and spread the dough out with your fingers so that it covers the bottom evenly. Press into the dough to ensure you’re spreading it evenly across the pan. Add more shredded mozzarella to the top side of the dough along the edges. 

Cover with a cloth and allow it to rise for about 1 hour. In the meantime finely dice 2 yellow onions. Saute onions in olive oil on medium heat until golden. Mix in half a cup of breadcrumbs and dried oregano and toss until evenly mixed through. Allow to cool. 

Using a spoon or your fingers, sprinkle the mashed anchovies across the surface of the dough. Spoon on a thin layer of the crushed tomatoes so it covers the entire surface. Using a cheese grater, add a layer of caciocavallo evenly across the entire surface of the dough. On top of the grated cheese, spoon on the sauteed onions mixture and spread out evenly across the entire surface. Using a knife, cut thin strips of caciocavallo and line the top edge of the pan, on top of the shredded mozzarella, with even more cheese. 

Cover again and allow to rise for one more hour. Bake at 425 degrees for about 30 minutes, checking periodically. As it bakes the outer edge of cheese will form a wonderful crispy crust. 

crust.jpg

Sourdough Focaccia

Mix together 410 g of water and 530 g of bread flour and set to autolyse for up to six hours.  Add 15 g of salt and 90 g of active sourdough starter and start working into the dough with your hands or with a rubber spatula until more or less homogenous. Let rest/relax for 45 minutes. You’ll want to fold the dough two more times (with your hands) over the course of the next 1 - 2 hours to develop the gluten. By the end the dough should be very smooth and should not stick to your hands while folding. Cover and rest overnight at room temperature. 

focaccia stack.jpg

In the morning transfer the dough to well oiled pan. Spread the dough out so it has a uniform thickness. Use the tips of your fingers to press down into dough to create little pockets. Drizzle more olive oil on top, sprinkle with flake salt and herbs. Let proof in the pan for another 2-3 hours.

Set oven to 450F. Bake for 20 - 25 minutes until golden brown and well risen. Remove from oven and try not to eat immediately.

focaccia dough.jpg

Shredded Short Rib Sandwich on Wood Fired Sourdough Roll

Growing up in a home of Sicilian immigrants my food experience was very much influenced by the traditions that my parents and grandparents brought with them to America. Rustic and at times unusual foods that were part of my daily life. There were also instances where the Italian and American influences came crashing together in delicious ways.

short rib sandwich.jpg

I have vivid memories of standing around the kitchen watching my Nonnas prepare red sauce and anxiously waiting for them to make me a sauce sandwich - which simply, is a big ladle full of hot sauce slathered on a piece of Wonder bread and topped off with another slice. The weight of the sauce would practically dissolve the flimsy pieces of bread but it was always one of the most satisfying bites of food that I can remember. It’s kind of the perfect representation of my entire food experience.

ribs in fire.jpg

This sandwich is my homage to them, a sauce sandwich made with a deep and decadent 5 hour meat sauce with shredded short ribs, topped with grated caciocavallo, basil, and served on a wood fired sourdough roll. This is serious business.

ribs in sauce.jpg
wood fired.jpg
crumb.jpg

Sourdough Sesame Rolls

I’ve been fine tuning this recipe for a few months and finally getting to a good place. It was a lot of trial and error, and ultimately deciding that I should remove all added fats (olive oil or butter) to let the fermentation happen unaltered. I also ratcheted up the autolyse time up to 6 hours which seemed to have a big effect on the airiness of the crumb and softness of the bread.

crumb.jpg

Mix together 400 g of water and 530 g of bread flour and set to autolyse for up to six hours. Add 20 g of salt and 90 g of active sourdough starter and start working into the dough with your hands or with a rubber spatula until more or less homogenous. Let rest for 45 minutes. You’ll want to fold the dough two more times (with your hands) over the course of the next 1 - 2 hours to develop the gluten. By the end the dough should be very smooth and should not stick to your hands while folding. Cover and rest overnight at room temperature. 

In the morning transfer the dough to a clean working surface dusted with flour. Divide the dough into 4 - 6 equal parts depending on the size and shape of the rolls you’re making. Shape each piece being careful not to degas the dough. Set the balls onto parchment paper and sprinkle each piece with plain sesame seeds or poppy seeds depending on your preference. Cover and let rise for 2 - 3 hours.

rolls.jpg

Set oven to 450F. Using a bread laim, score each dough ball. Bake for 30 minutes with a heat proof bowl of water in the oven to create ambient moisture. Remove rolls from oven and allow to cool before slicing. 

roll crumb.jpg

Wood Fired: Because of the difficulty of keeping consistency in a wood fired oven, I parbaked the rolls in a conventional oven for 20 minutes, and then moved them into the wood fire to finish them off. This reduces the risk of burning but gives the bread a nice rustic flavor and crust.

proffing.jpg

Slow Pizza : 120 Days Start to Finish

Firing this pizza in the @oonihq Pro oven only takes about 60 to 90 seconds. But this peak season pie, built around sweet golden cherry tomatoes, padron peppers, and basil took 120 days to make - from the planting of each seed, to the transfer outdoors, and to the ultimate harvest when the vegetables are in peak form. It’s a pie that only happens during a short window during the summer, and with the addition of soppressata - it’s one that is essential every year at the height of the summer season. Video about the process below.

garden pie.jpg
gardening triptic.jpg

Detroit Style Pizza

After a few months of making Neapolitan style pizzas in my new wood fired oven I wanted to try something a little different. It was a little more challenging than making a quick 60 second pizza right on the stones and maintaining steady temperature over a longer period of time. Ultimately the pizza tasted really good but I definitely need to work on the temperature regulation next time around. Some areas got a little too charred.

detroit1.jpg
IMG_7134.jpg

In the process I learned a lot about the origin of Detroit pizza and how it relates to Sicilian pizza. I made a short video that dives into the history of Detroit Style and the evolution of Sicilian pizza.

Sfincione : Traditional Sicilian Pizza

When thinking about pizza and New York City I doubt many people would consider a sfincione pie, but as a child of Sicilian immigrants it was an essential part of my pizza experience. When visiting relatives in Brooklyn, we always stopped at @rosas.pizza because they made some of the best sfincione around. It wasn’t until recently that I decided to make it myself. This version is wood fired in a cast-iron skillet using a naturally leavened dough and it brings me back to those long car rides on the BQE with the smell of a warm sfincione hanging in the air.

sfincione.jpg

The Sunday Pie: Meatballs and Ricotta

A few months ago I came across an article about an outdoor cookware company looking to contract a small group of bakers and home cooks to become “Official Pizza Taste Testers”. And if there is one thing I’m good at, it’s eating pizza. So I applied along with over 5,000 other people. Fast forward a few months and I get notified that I was officially selected. A years-long obsession with being able to make proper wood fired pizzas became a reality. It’s an unusual opportunity but one that I’m excited to explore. So over the course of the next few months I’ll be developing and testing recipes, and making short videos about the process - some of which you can find over at @oonihq. This first video is an homage to my family of Sicilian immigrants and to the women who orchestrated our Sunday suppers.

sunday pie large 1.JPG