Brik with Wild Spring Greens & Morel Mushrooms

Brik is a popular north African street food with many different regional variations. The version I’ve come to love are commonplace in Tunis, where my dad spent the first 14 years of his life. It wasn’t until more recently that I truly realized how special they are. Tumeric spiced potatoes, capers, chopped onion, and a whole egg packed into a delicate pastry dough, fried until crispy, topped with some harissa or fermented bomba paste and a squeeze of lemon. They are deeply satisfying. Crunchy on the exterior and velvety on the inside.

The version here layers in some freshly foraged ramp leaves and morels - but any sort of fresh herbs or greens (think nettles, wintercress, spring onions, etc) would work really well in this format. The recipe here features a homemade pastry dough - mixed together like a crepe batter and painted onto a nonstick pan on a double boiler. If you don’t want to make a fuss, any store bought spring roll wrappers work really well too.

Recipe as follows and video of the whole process below.

brik 2.jpg

The Pastry Dough (Warqa)

Ingredients

100 g 00 Flour

150 g semola flour (or similar)

1 tbsp olive oil

1 tsp salt

450 g room temperature water

*makes about 10 8” circles

Directions

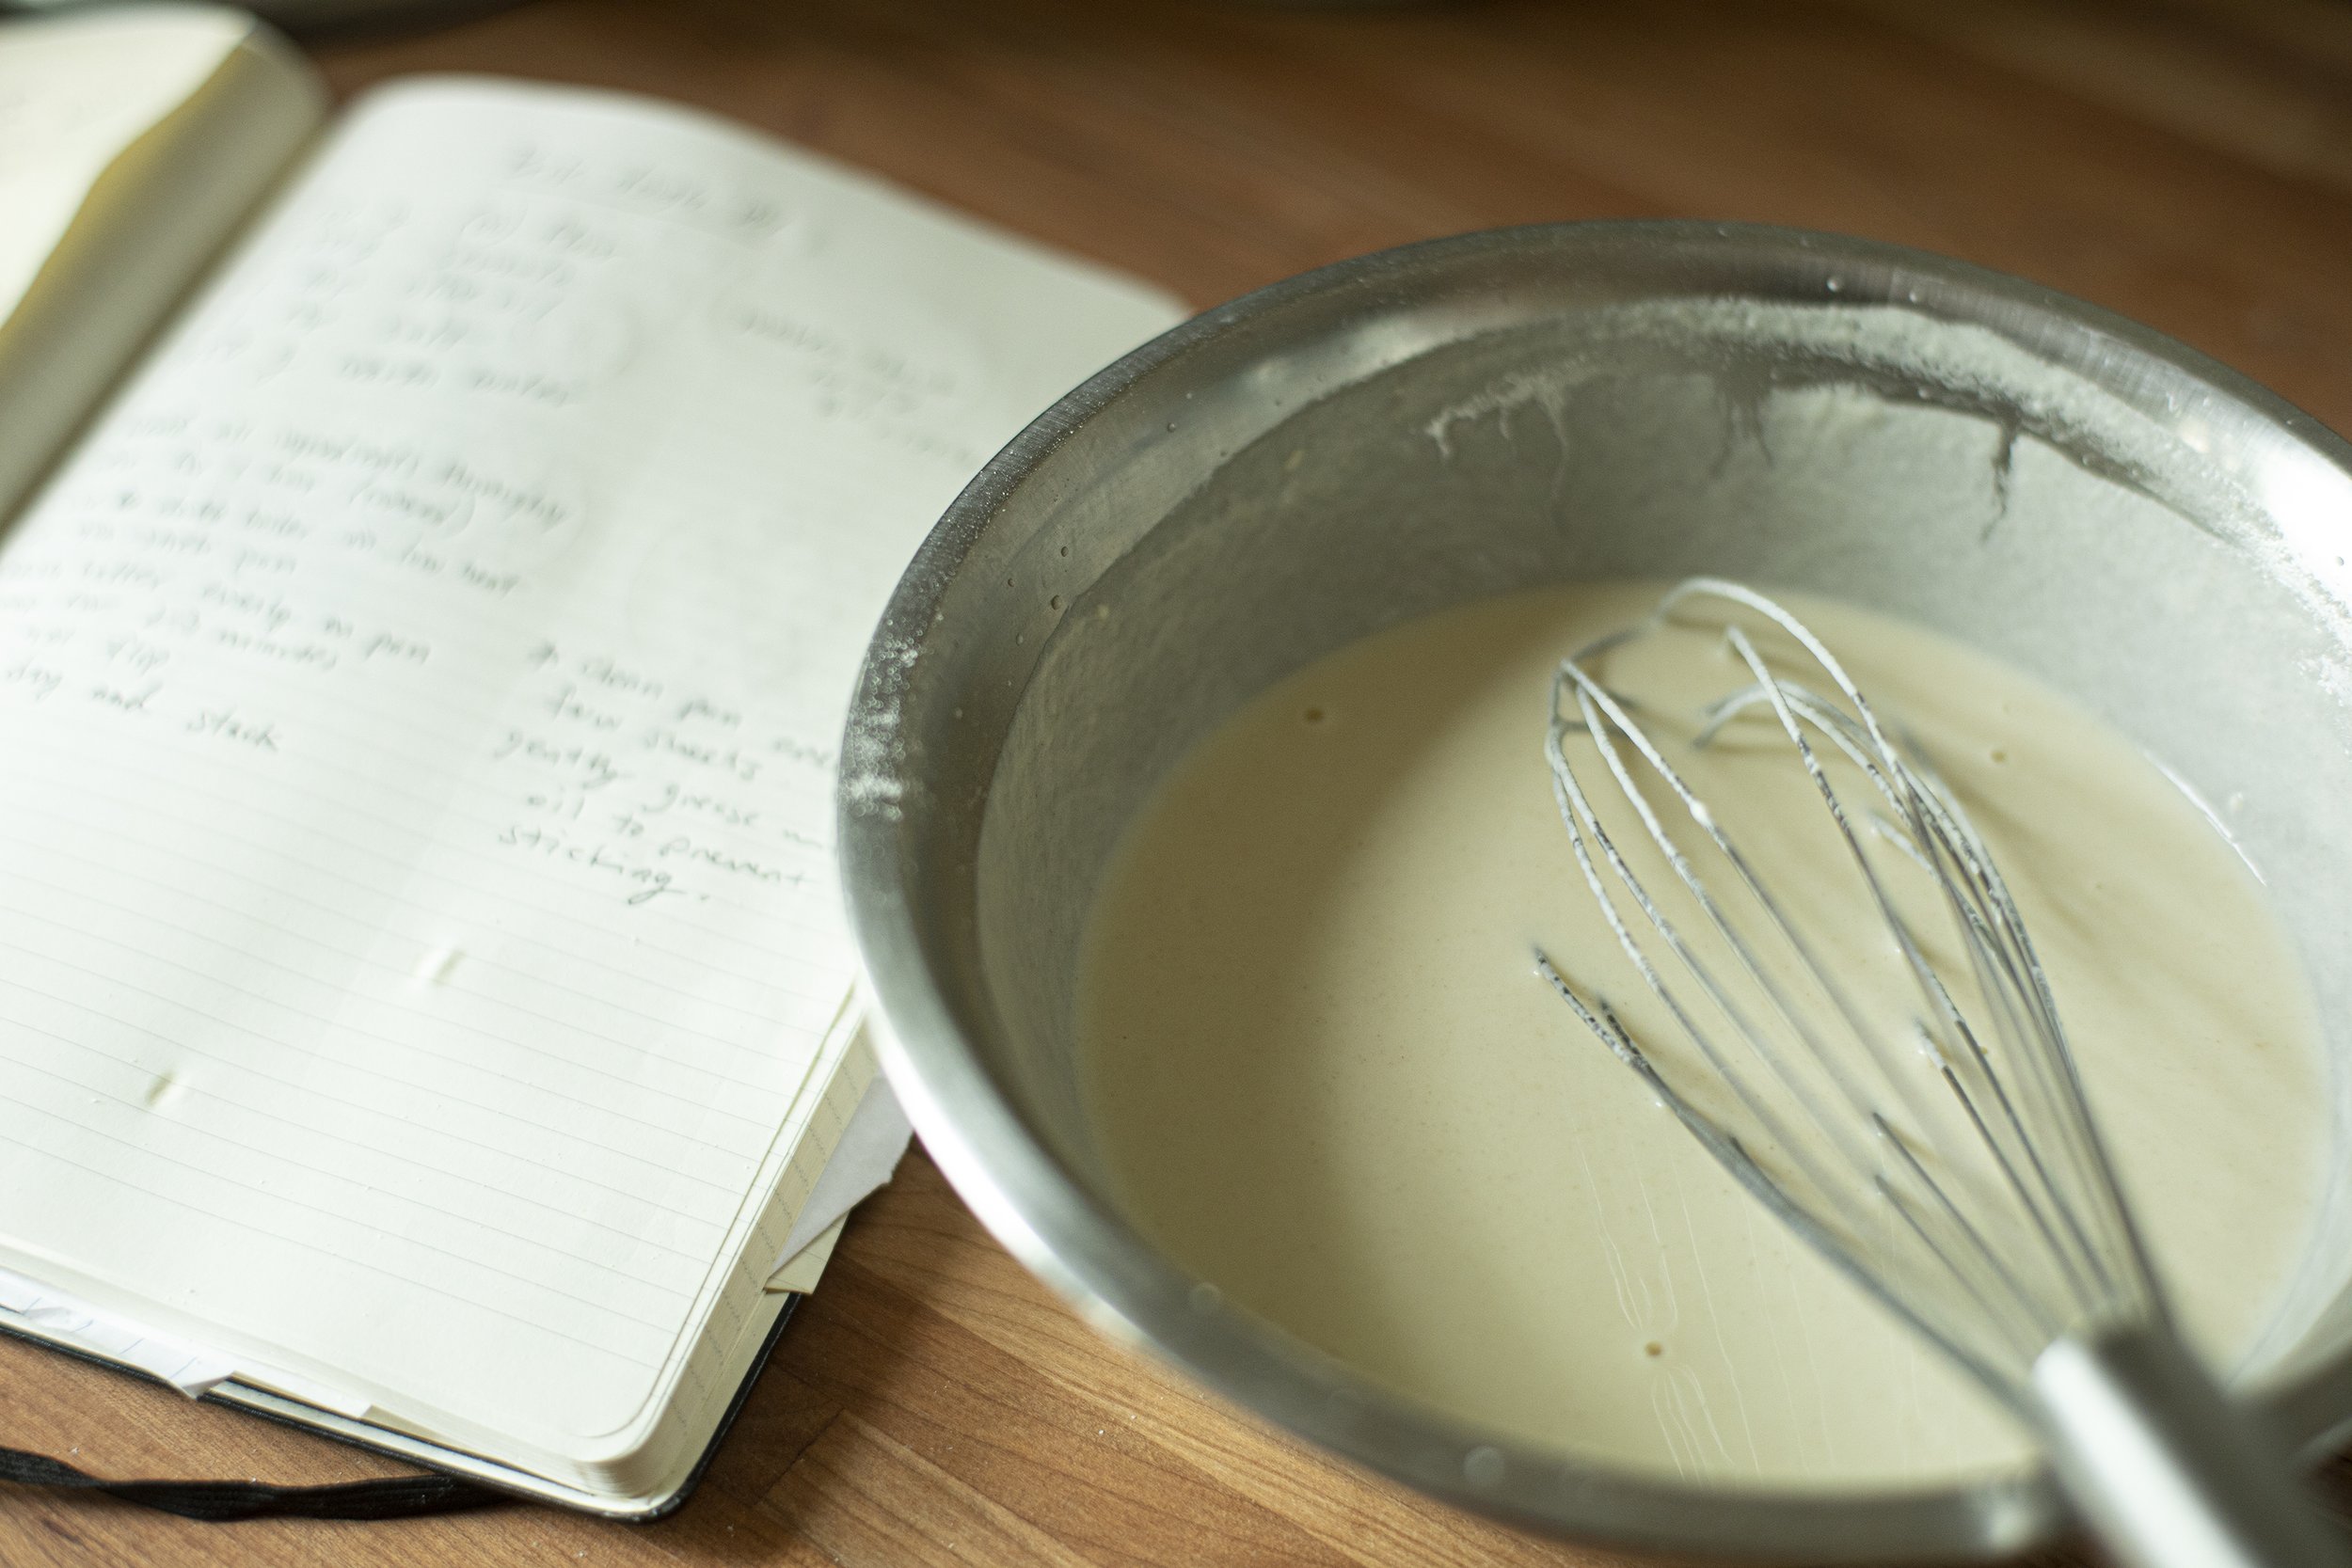
  1. Mix all ingredients together in a bowl and whisk together until there are no clumps. You can use a food processor for this step as well.

  2. Cover and allow to rest for 1 hour.

  3. Set a non stick pan over a pot of boiling water to create a double boiler.

  4. Lightly coat the surface with olive oil. This step is important and you’ll want to ensure the surface is clean and oiled before each time you make a sheet of dough.

  5. Using a brush, “paint” on a thin layer of the batter across the entire surface. Work quickly and make sure there are no holes as you go. The batter will quickly start to solidify on the hot pan. After about 3 - 4 minutes the dough should be ready. Use a spatula or utensil to peel the dough away from the edges of the pan, carefully remove the pastry dough and transfer to a clean work surface to air dry. Repeat the process until all the batter is gone.

  6. After air drying, they can be stacked and if done properly they will not stick to one another. Wrap in a clean towel and set aside until ready to cook.

The Brik

Ingredients

About 6 medium yellow potatoes (peeled)

1 tbsp tumeric powder

1 tsp salt

About 6 - 8 ramp leaves (or finely diced red onion)

8 oz of fresh morels (or similar mushroom)

2 tbsp chopped capers

1/4 cup good olive oil

Directions

  1. Bring a pot of water to a boil and boil the potatoes until fork tender (about 20 minutes).

  2. Drain and set aside to cool.

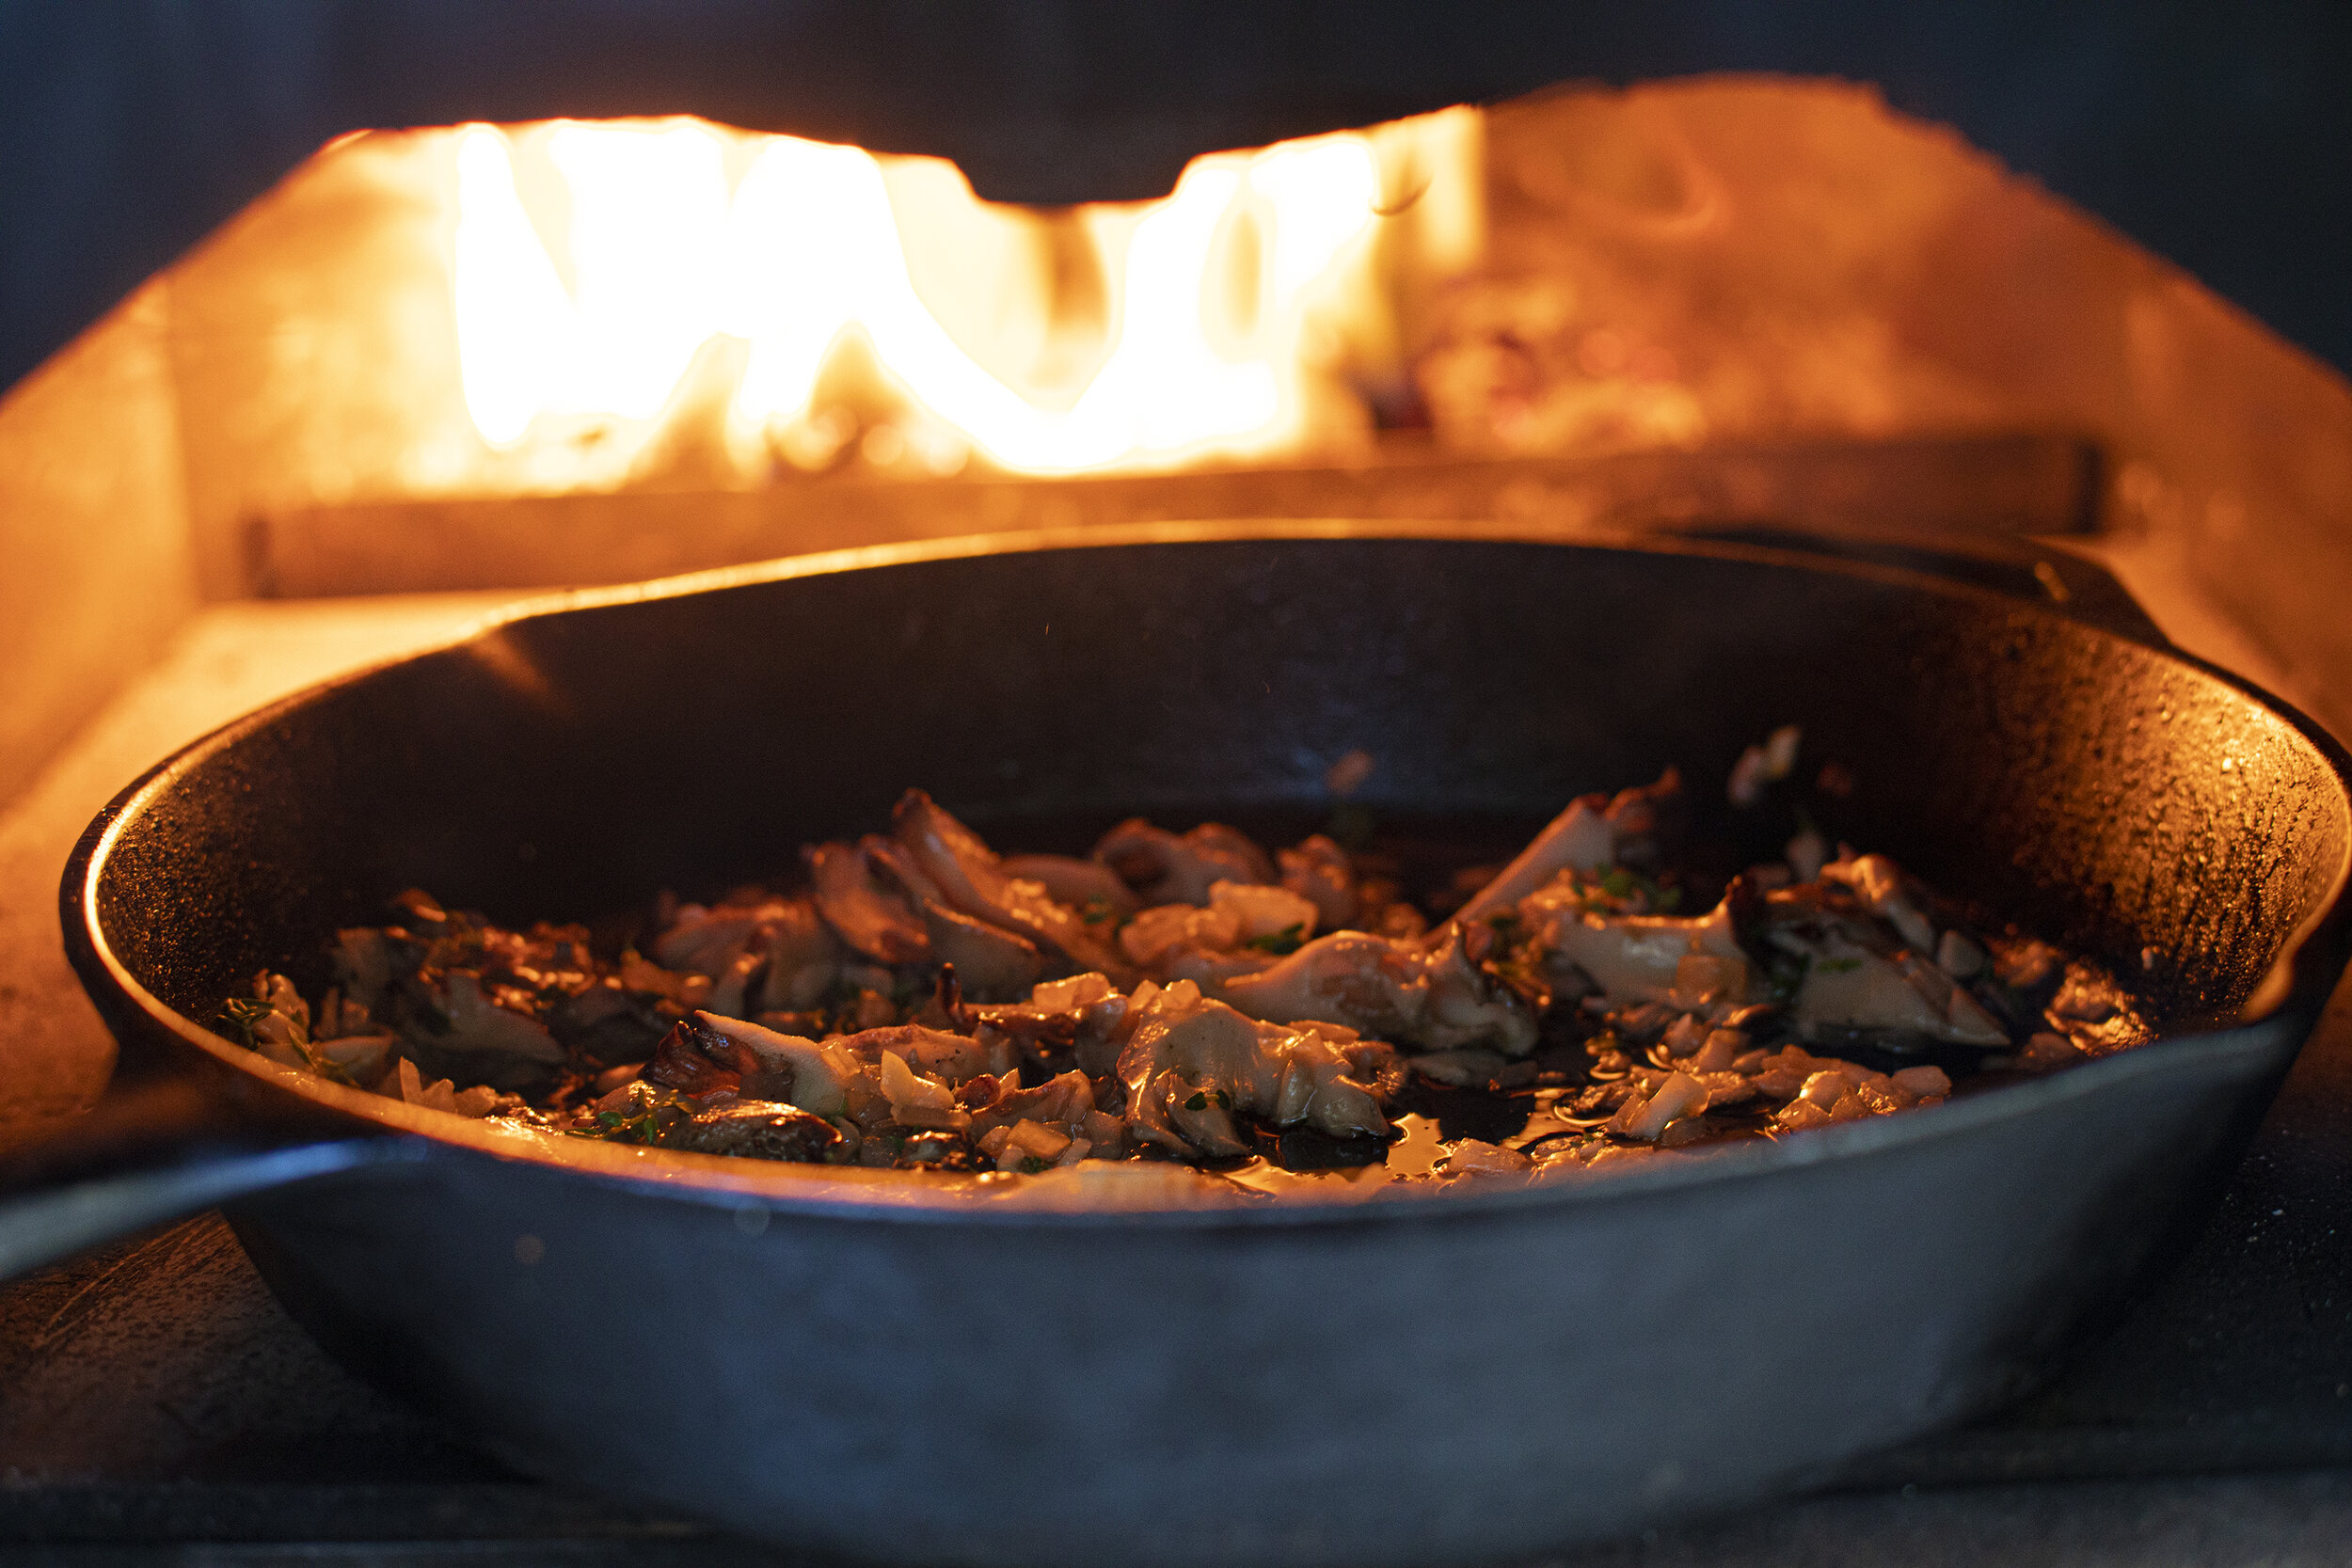
  3. In a medium skillet saute the diced morel mushrooms in some olive oil. They will reduce in size significantly as they cook. Season with salt and pepper to taste. Cook for about 10 minutes until they start to form a nice brown color. Add chopped ramp leaves and saute for a few minutes until the mixture is well incorporated and fragrant.

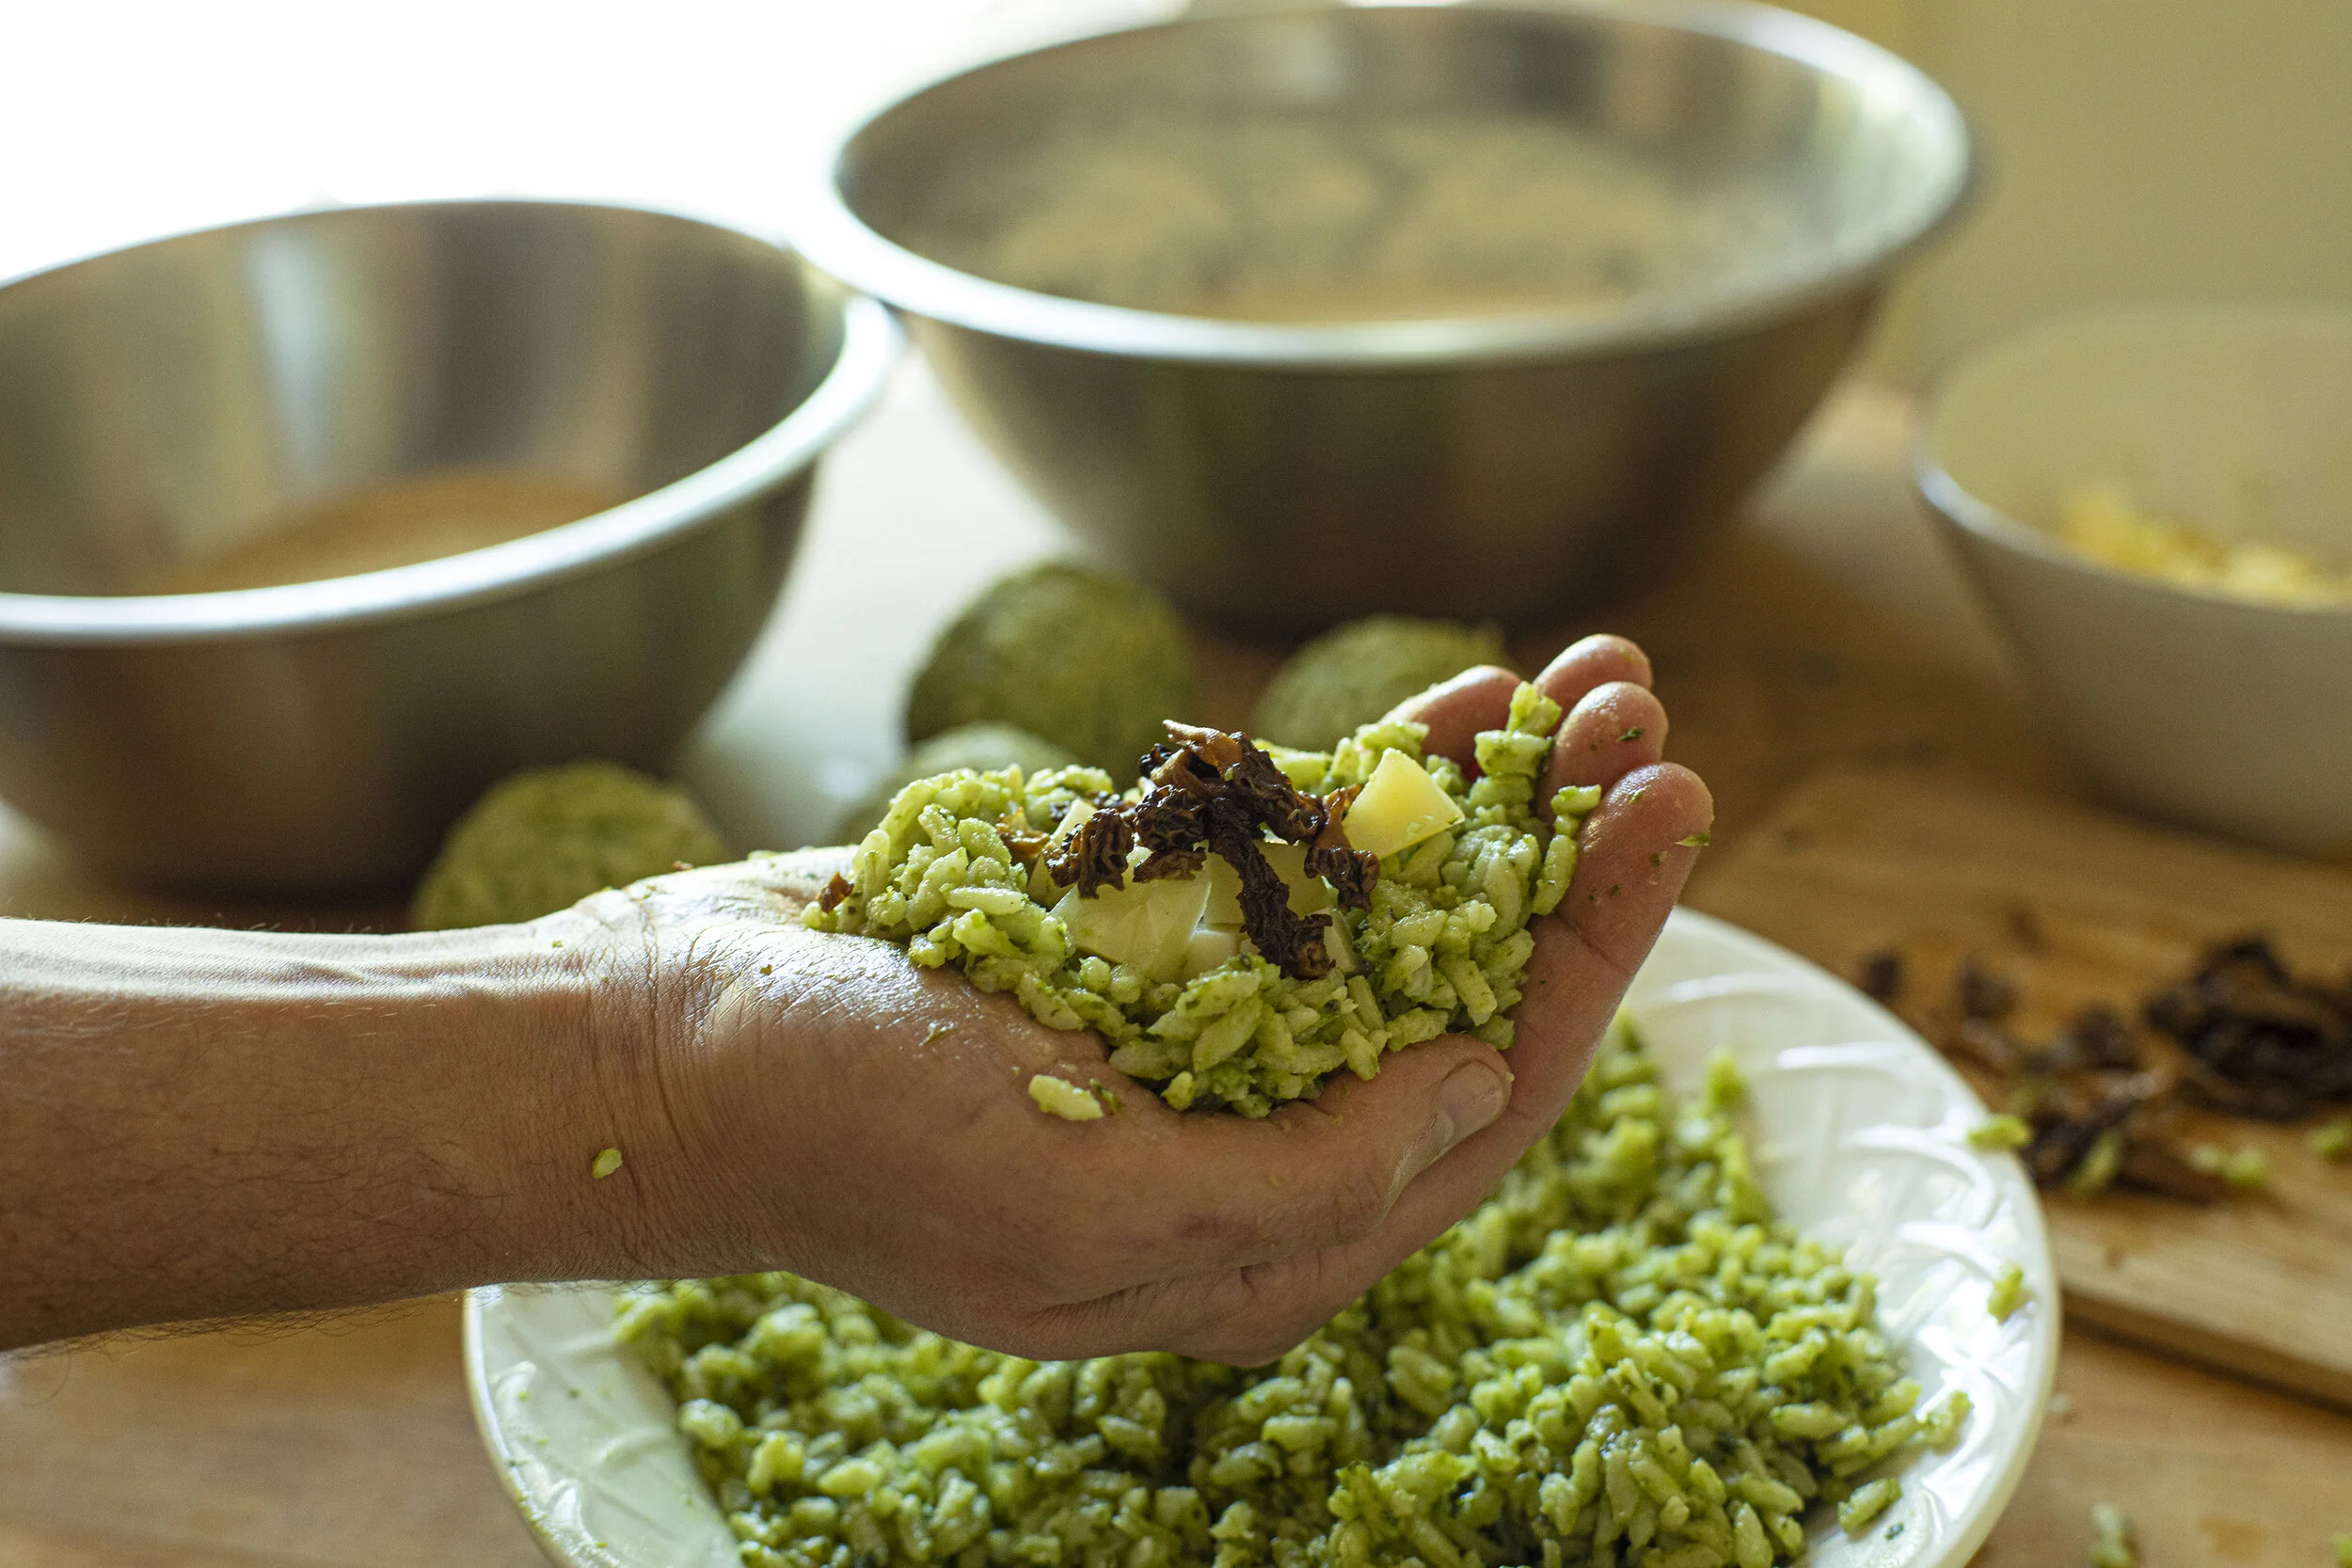
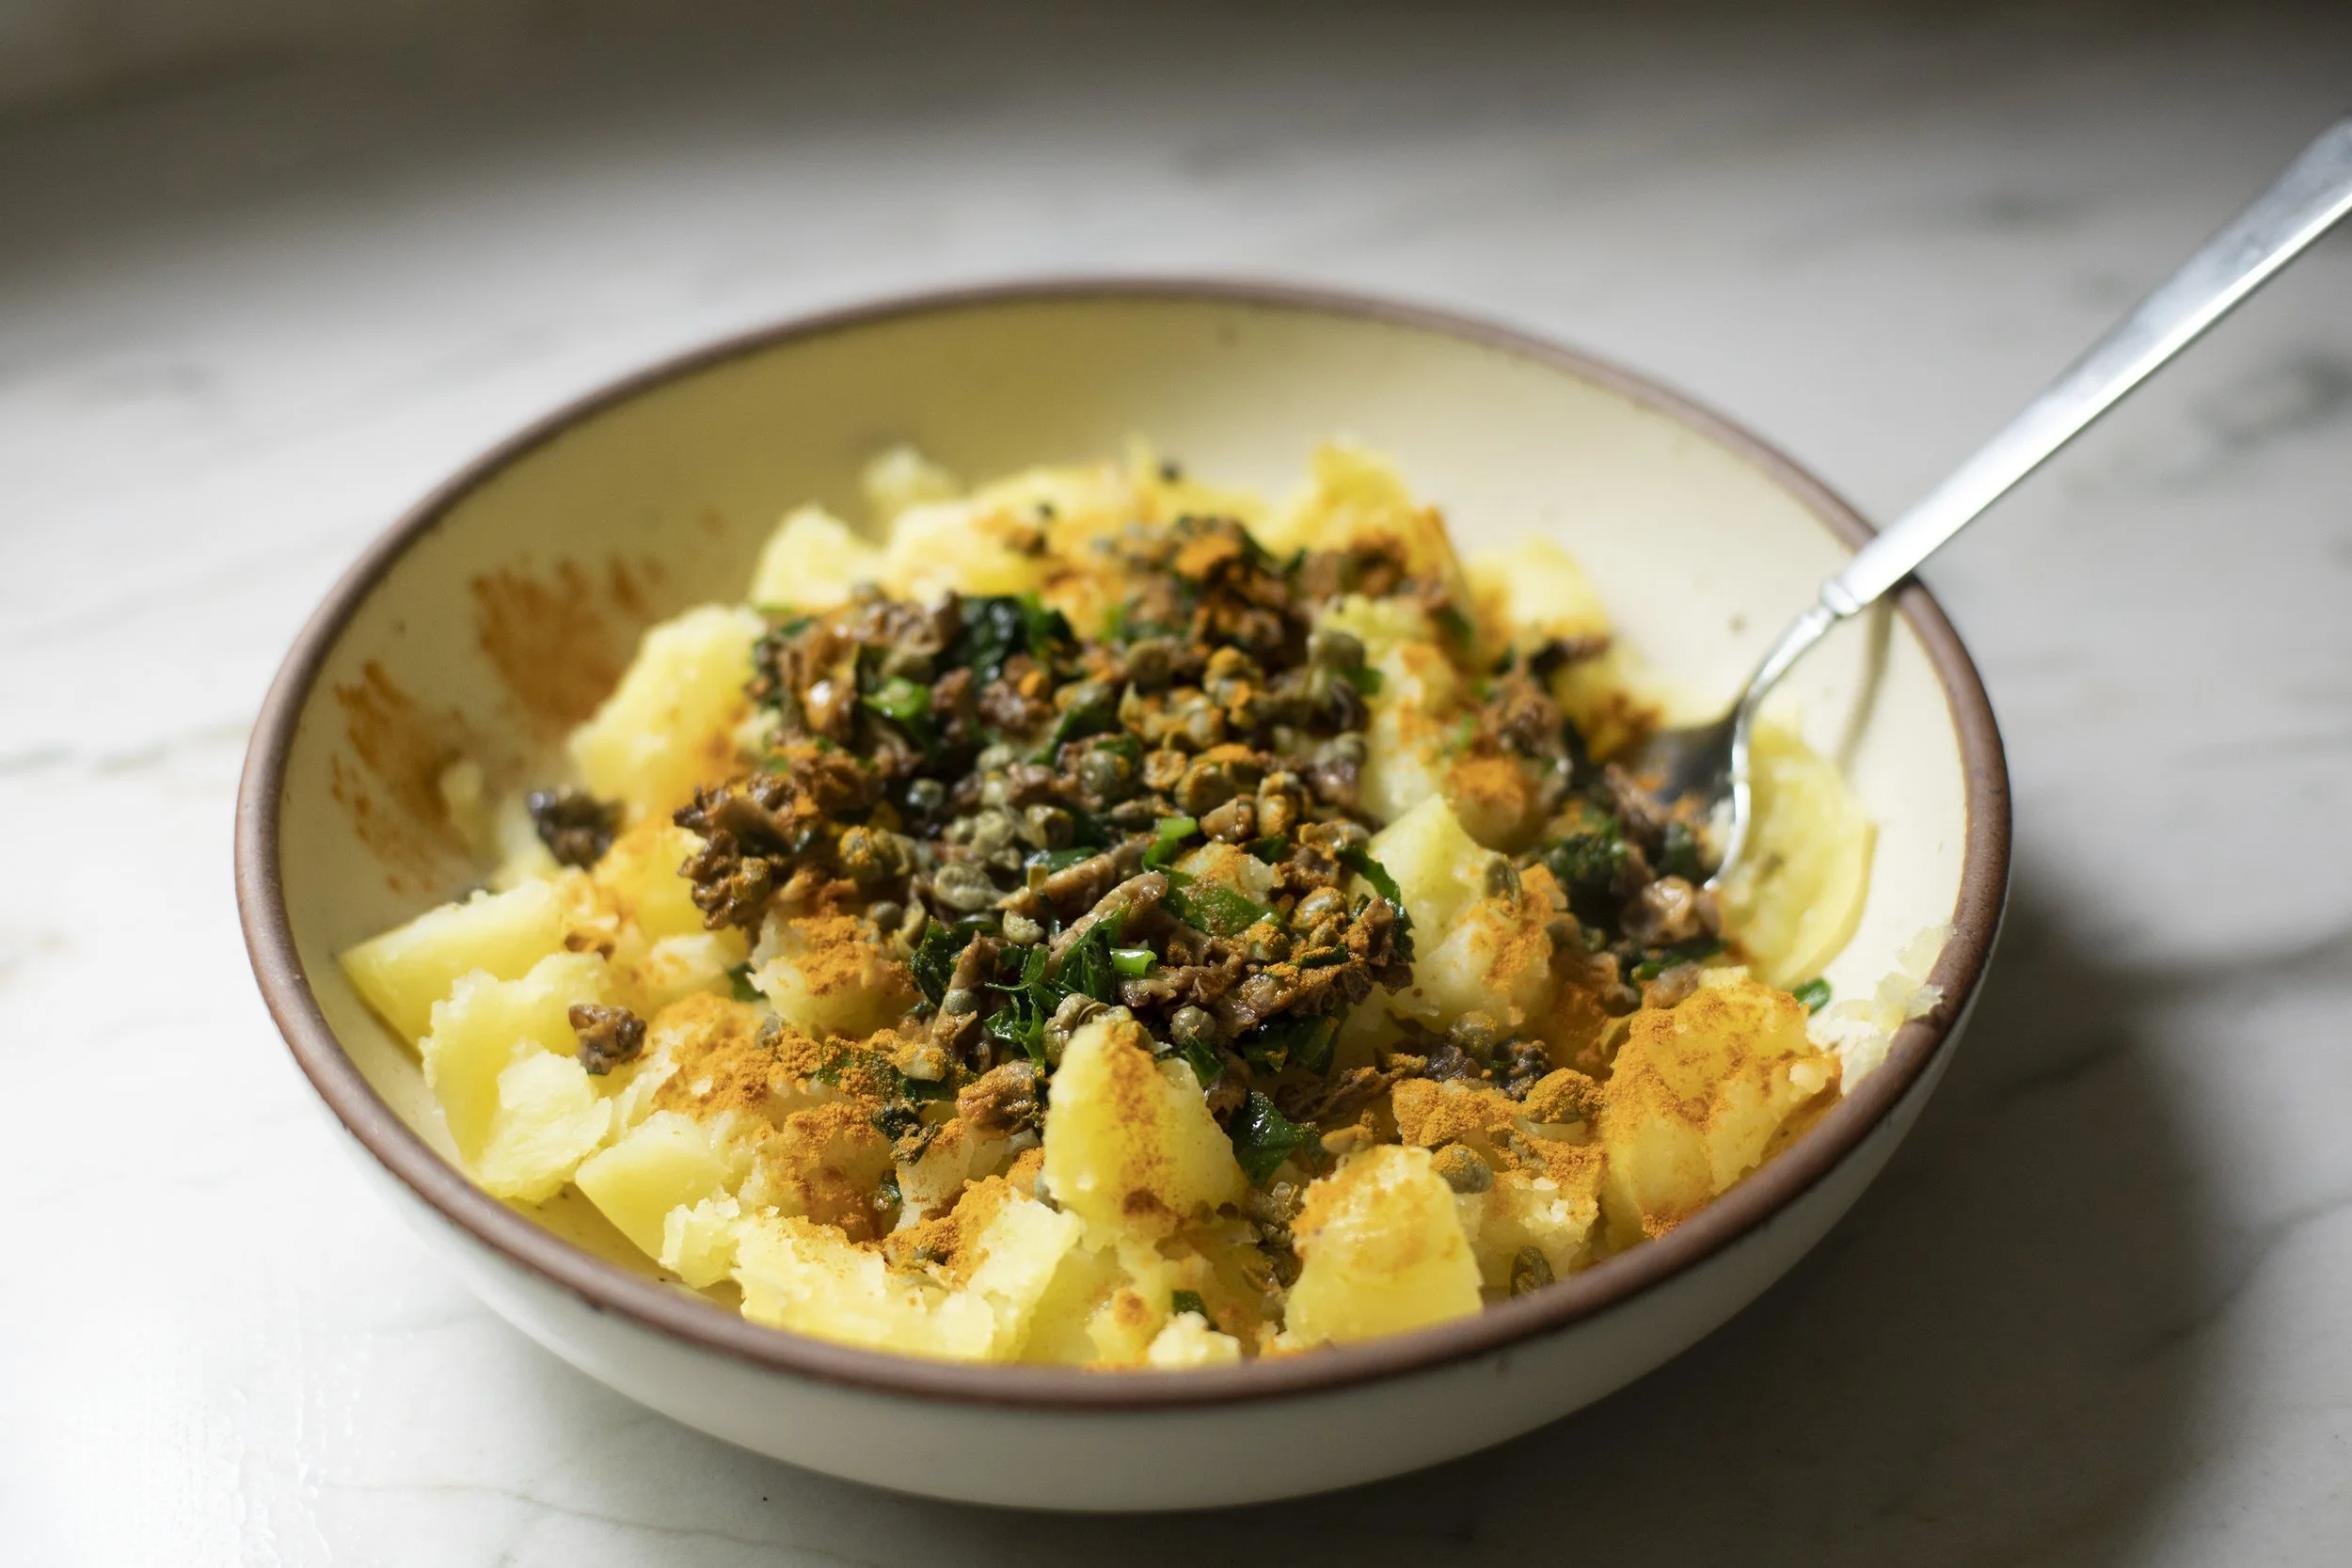
  4. Mix the ramps and morels with the potatoes and use a fork to smash it all together.

  5. Add the capers, tumeric, and olive oil, a little salt and pepper and continue mashing.

  6. The mixture should be slightly chunky and glistening with the olive oil. Here you can add some harissa to the mixture if you like it spicy.

  7. Bring a nonstick pan to medium heat and cover the bottom with olive oil.

  8. On a clean plate, lay down a sheet of the pastry dough. On one half of the dough spoon on the potato mixture and carefully create a well in the center large enough to crack an egg in the middle and leaving room along the edges to fold over.

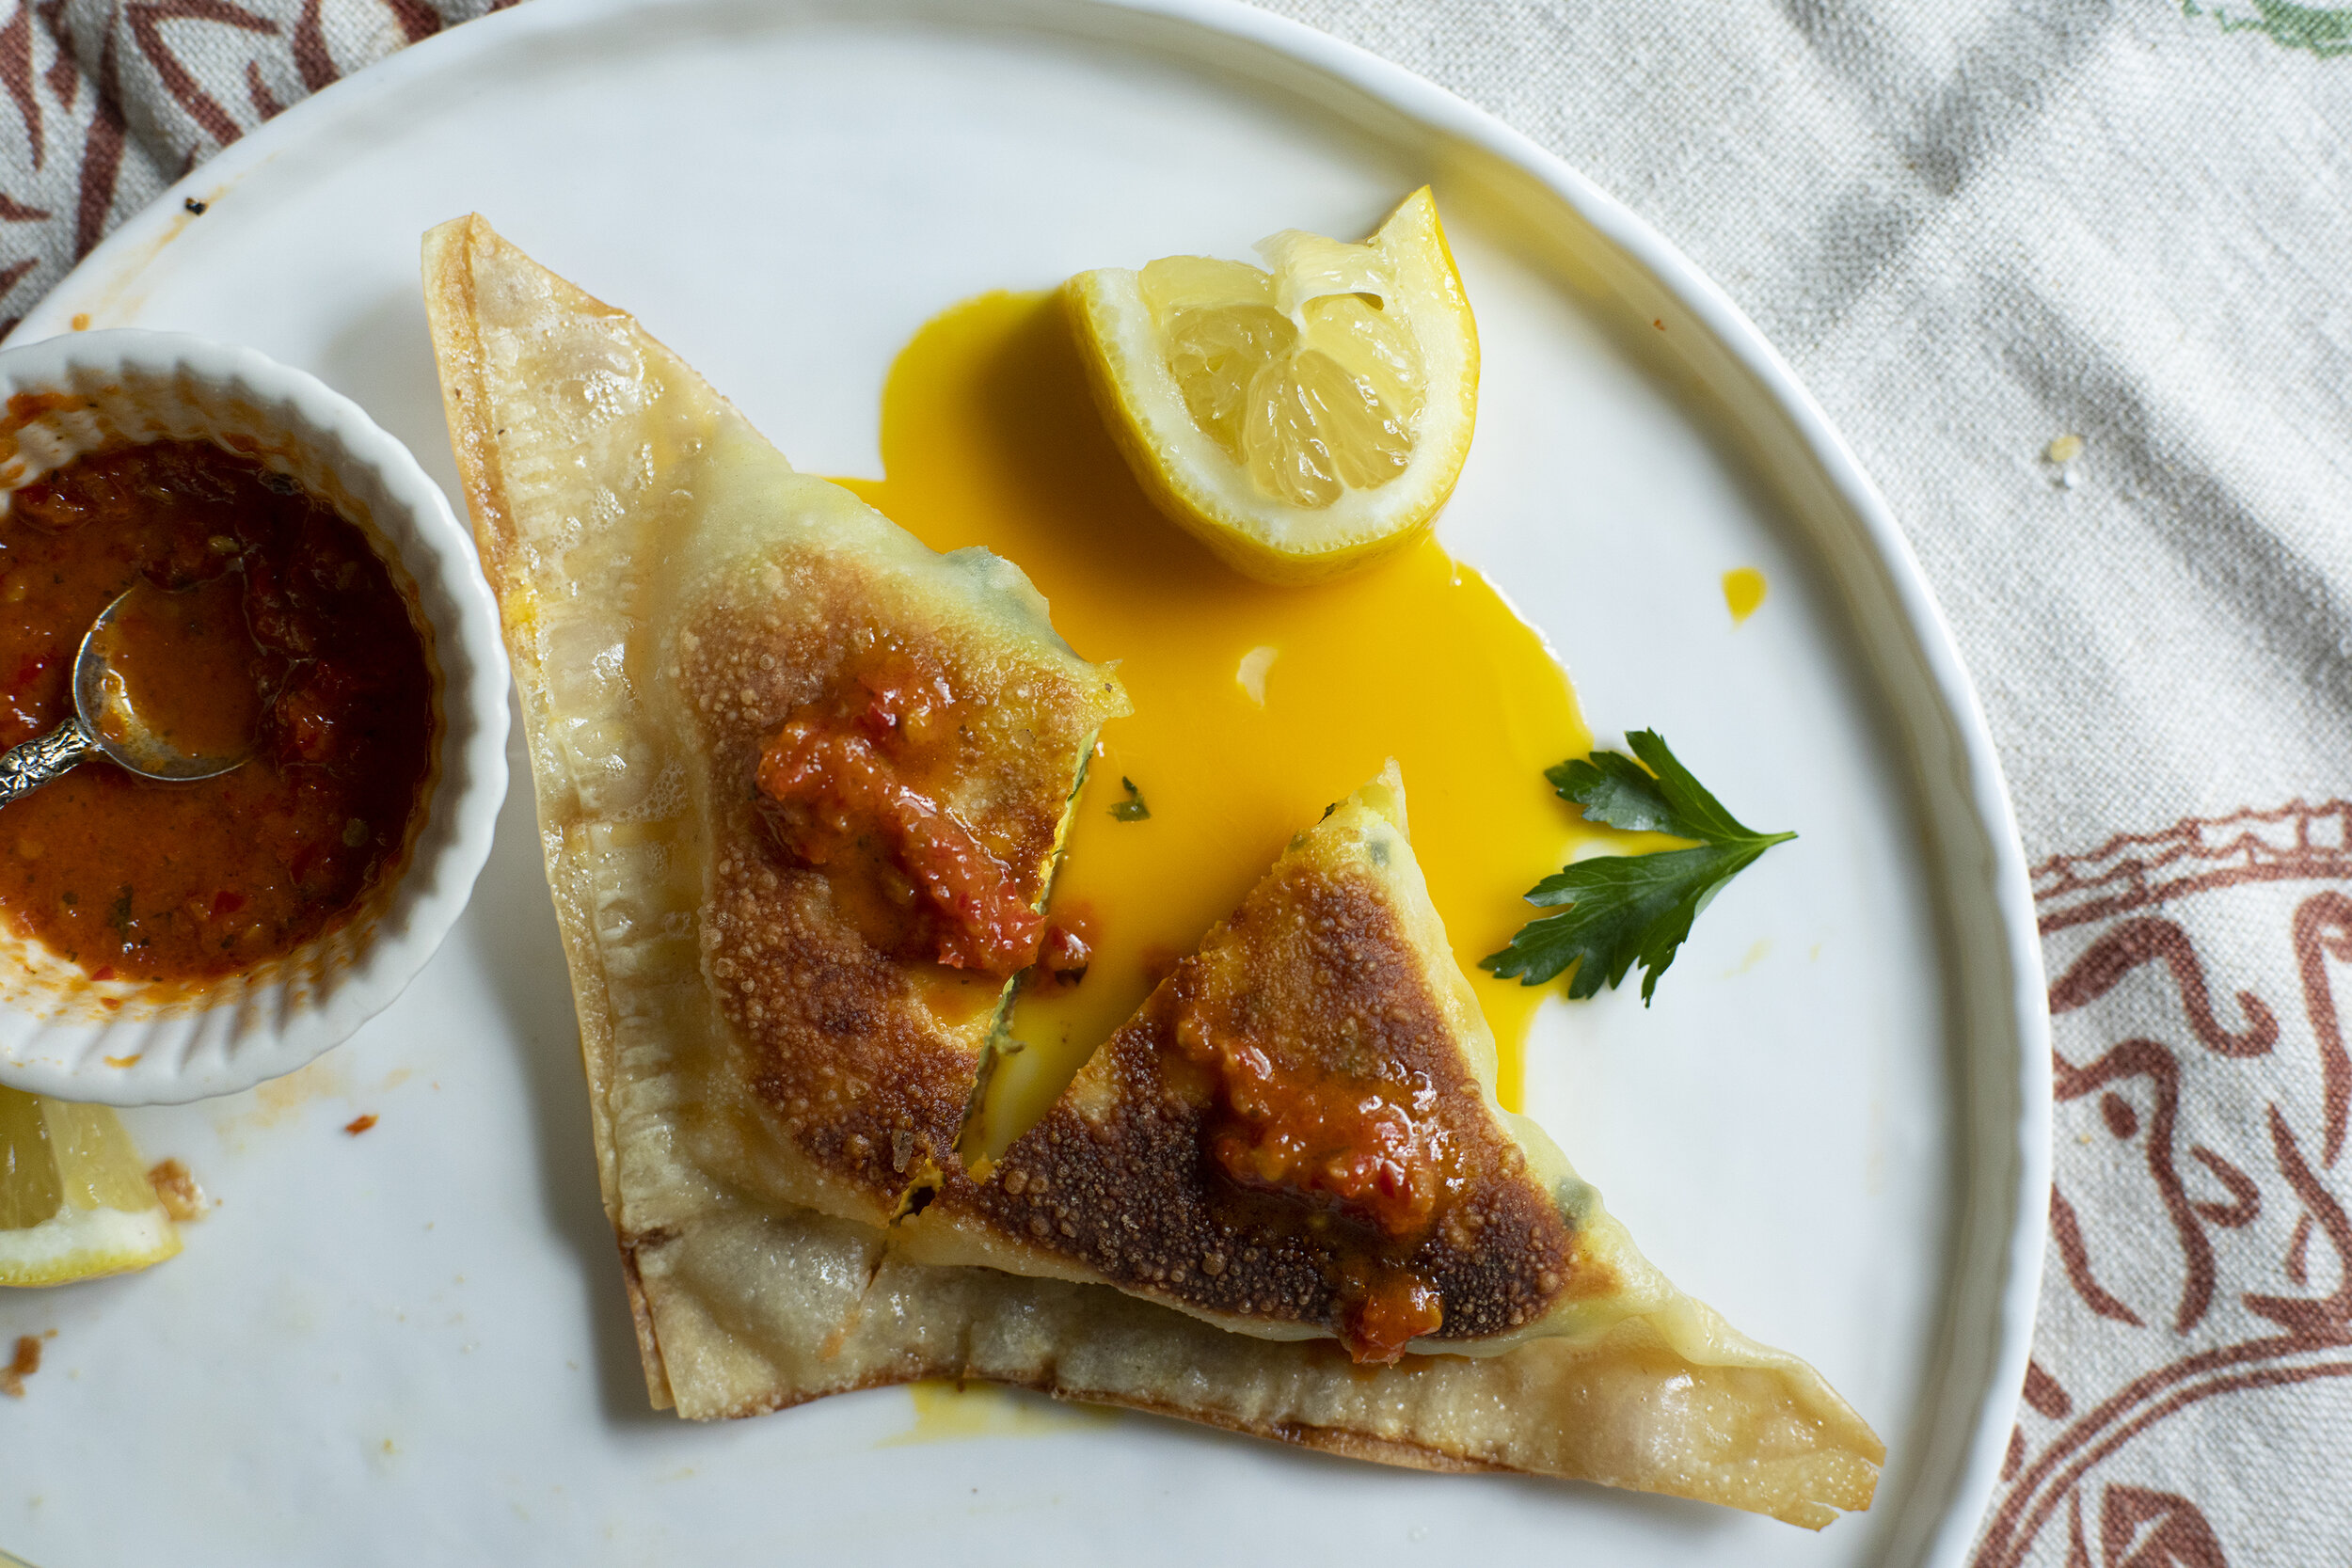
  9. Brush on an egg wash along the edges, fold the circle in half, pressing the edges to seal and carefully slide the brik into the hot pan. Fry for about 3 minutes until crispy and golden brown. Using a spatula, carefully flip the brik over and fry the other side for another 3 minutes until golden brown.

  10. Transfer to a paper towel lined dish to absorb excess oil and allow to cool for a few minutes before eating.

  11. Serve with harissa, fermented bomba, and a squeeze of lemon.

brik 1.jpg

Creamy Polenta with Caramelized Mushrooms and Shallots

This caramelized mushroom and shallots over creamy polenta is easy, quick, only uses two pans, and features shiitakes from the Foraged Feast, but any mushrooms would work well in this dish.

The mushrooms

Ingredients

8 oz shiitake mushrooms

Fresh sage leaves (about 10 whole leaves)

3-4 Shallots

2-3 cloves of garlic (thinly sliced)

Olive oil

2 tbsp butter

Splash of white wine (about 1/4 cup)

Salt & Pepper


Directions

1. Set your oven to 400F.

2. Thinly slice the mushrooms and shallots into slivers.

3. Spread them out evenly across a large well-oiled sheet pan.

4. Evenly distribute the sage leaves across the pan.

5. Drizzle with more olive oil, toss everything to lubricate, and then spread everything out evenly again in the pan.

6. Season with salt and pepper.

7. Bake at 400F for 15 mins.

8. Remove from the oven and add the butter, a splash of white wine if you have it, and the sliced garlic. Toss, and spread evenly again in the pan.

9. Bake for another 10 minutes until fragrant and nicely caramelized.

The Polenta

Ingredients

3 cups whole milk

3 cups stock

1 cup of grated Provolone Picante

4 tbsp butter

1 cup of cornmeal

salt to taste

Directions

1. Bring the milk and stock to a low boil in a heavy duty pot.

2. Slowly add the cornmeal and stir in gradually. Reduce the heat to a gentle simmer.

3. This recipe requires a bit of constant attention, as you'll want to continually stir the polenta so it doesn't clump up and stick to the bottom of the pot.

4. After about 25 minutes, add the cheese, butter, and salt. You can adjust with more liquid if you find it too thick.

5. After another 5 minutes, the polenta should be nice and creamy. It will firm up as it cools down.

6. Remove from the heat.


The final plate

1. Ladle a big spoonful of polenta into each bowl.

2. Top with the mushrooms and shallots. The sage will now be wonderfully crispy and can be used as an edible garnish on each plate.

3. Finish each plate with fresh cracked pepper and more grated cheese of your choice.

Wild Spring Quiche with Morels and Ramps

This quiche has been on my mind for a while and the stars finally aligned - morels (sautéed in duck fat), ramps, fontina, and some sweet/mild Chimayo chili flakes that I just brought back from New Mexico, all cradled in a flaky pie crust. It was better than I even expected and works as breakfast, lunch, or dinner. Video of the whole process below.

Whatever it is, the way you tell your story online can make all the difference.

Whatever it is, the way you tell your story online can make all the difference.

Ingredients

6 eggs

3/4 cup heavy cream

1 cup finely diced fontina cheese

1/2 cup fresh ramp leaves (sliced into strips)

1 cup fresh morels (or other mushroom of choice) thinly sliced

1 tbsp dry chili flakes (I’m using a mild Chimayo chili for this but modify according to how spicy you like)

Duck fat (or butter)

Whatever it is, the way you tell your story online can make all the difference.

Whatever it is, the way you tell your story online can make all the difference.

Whatever it is, the way you tell your story online can make all the difference.

Whatever it is, the way you tell your story online can make all the difference.

Whatever it is, the way you tell your story online can make all the difference.

Whatever it is, the way you tell your story online can make all the difference.

Directions

  1. Set the oven to 375F.

  2. Chop/dice your fresh mushrooms and ramp leaves.

  3. Bring a medium sized pan to medium heat.

  4. Drop in about two tablespoons of duck fat or butter.

  5. Saute the morels for about 5 minutes.

  6. Add the dried chili flakes and continue to simmer on medium/low for a few more minutes.

  7. Add the ramp slivers and turn the heat off. It will smell fragrant and amazing. Allow to come to room temperature.

  8. In a bowl, whisk together the eggs and heavy cream.

  9. Add the finely diced fontina (grated works here too) into the egg mixture.

  10. Add the mushroom & ramps mixture and mix well. The oil from the chili flakes will mix with the eggs and make a wonderful orange color.

  11. Season with salt and pepper.

  12. Pour the egg mixture into your prepared/parbaked pie crust. (see below for more details about how I made it, but feel free to use whatever pie dough recipe you prefer. The recipe I am using requires you to pre-bake the crust for 20 minutes before you add the filling.)

  13. Bake at 375F for about 40 minutes until the eggs are set and the crust is a golden brown.

  14. Remove from the oven and allow to cool for about ten minutes before eating.

  15. Enjoy.

The Pie Crust

I’m using a Smitten Kitchen recipe for my pie dough which uses the following ingredients.

Ingredients

8 tbsp butter

1 cup of all purpose flour

1/3 tsp sea salt

1/4 cup cold water

1/2 tbsp granulated sugar

I followed her recipe and was very satisfied with the results - a recipe with very similar proportions as many other pie dough recipes you’ll find online.

Whatever it is, the way you tell your story online can make all the difference.

Whatever it is, the way you tell your story online can make all the difference.

Whatever it is, the way you tell your story online can make all the difference.

Whatever it is, the way you tell your story online can make all the difference.

Candy Cap Caramel Donuts

An experiment. When I first started reading about candy caps I was immediately intrigued. People always describe them in such vivid detail, emitting a perfume that smells overwhelmingly like maple syrup. A smell that saturates the room for hours. It’s one of the few mushrooms that lends itself to sweets and non-savory applications. While they don’t grow on the East Coast I was fortunate to get my hands on some from @theforagedfeast . I cycled through various ideas about what to make, read through all of @foragerchef ‘s lovely candy cap recipes and eventually circled back to something closer to home - donuts. The initial reaction might be WTF, or mushrooms don’t belong in donuts, but I assure you that these are not your average mushrooms. There might be some mental threshold that needs to be crossed for the mushroom skeptics out there, but on taste alone these are pretty special. I used a small percentage of dried candy cap powder for the dough which was naturally leavened over two days, deep fried, glazed and drizzled with a decadent salted candy cap caramel sauce. They might not end up on the menu of my hypothetical donut shop that I've been dreaming up, but they were a worthy experiment to work with some unexpected wild ingredients and produce something sweet and delicious with an incredible texture. Video of the whole process below.

finished candy cap donuts.jpg

Ingredients:

230 g Manitoba 0 Flour (or similar)

25 g Whole Wheat Tumminia Flour

12 g dried candy cap powder

50 g water

40 g sugar

50 g butter (cubed)

90 g eggs (approx 2 medium sized)

5 g salt

110 g active sourdough starter

1 tsp vanilla

1 gallon neutral oil

*makes approximately 6 - 8 donuts depending on size

The recipe is spread out over three days and in my opinion is well worth the wait. The natural leavening always yields a tastier end result. I normally start my process around 12pm on day 1 which results in fresh donuts for breakfast two days later.

candy caps in hand.jpg
dough hook.jpg
punching out.jpg
frying.jpg

The Dough

Directions:

  1. 12 pm Day 1 - In a stand mixer, combine all your ingredients and mix for about 10 minutes.

  2. This is very similar to a brioche dough, so at first it will feel quite sticky to the touch, even after ten minutes of mixing.

  3. Transfer the dough to a bowl and cover.

  4. Over the next 5-6 hours you’ll want to fold the dough with your hands 4 times. Let the dough relax for at least 30 minutes in between each fold. By the fourth fold the dough will feel a lot less sticky and will be smoother to the touch. Avoid the urge to add flour if you find it is too sticky.

  5. 6pm Day 1 - Transfer the covered bowl to the refrigerator and forget about it for 24 hrs.

  6. 6pm Day 2 - Remove dough from the refrigerator and allow to relax for about 30 minutes. Do one more round of folding and set out at room temperature overnight.

  7. 7am Day 3 - Gently flour your work surface and dump out the dough.

  8. Bring your neutral oil up to 350F.

  9. Use your hands to spread it out evenly. Use a rolling pin to gently roll out the dough to approximately 3/4 inch thickness. Do not press down too hard as you want to keep some rise to the dough.

  10. Using a circular cookie cutter approx 4” in diameter, punch out as many donuts as possible. Save the scraps for maltagliate - ugly leftover shapes of dough that shouldn’t go to waste!

  11. Use another circular punch about 1/2” in diameter to punch out the holes in the center of each donut. Gently use your fingers to stretch it out ever so slightly.

  12. Drop each circular dough into the oil and fry for about 3 minutes each side until golden brown.

  13. Remove from the oil and set onto a rack or paper towels to dry off and cool slightly.

drizzling spoon.jpg
donut with bite.jpg

The Candy Cap Caramel

This recipe is based on a recipe from Sally McKenney.

Ingredients:

1 cup (200g) granulated sugar

6 Tablespoons (90g) unsalted, room temperature cut up into 6 pieces

1/2 cup (120ml) heavy cream, at room temperature

2 teaspoons big chunky flake salt

20g dried candy cap powder

Directions:

  1. Bring a medium sized saucepan to medium heat and add the granulated sugar. Using a rubber spatula or whisk, stir constantly for a few minutes until the sugar eventually melts into a thick brown liquid. Continue to stir and lower the flame to a low simmer.

  2. Once there are no more lumps, add the butter and continue stirring to combine. Whisk/stir vigorously so the sugar and butter combines without looking clumpy. This will take a few minutes.

  3. Add the candy cap powder and continue stirring for another minute.

  4. Very slowly pour in the heavy cream and continue stirring. It will begin to bubble as it simmers. Allow it to simmer like this for about 1 minute.

  5. Remove from the heat and as it cools add in the flake salt.

  6. Allow it to completely cool before using.

  7. It will keep in the fridge for about 1 month.

The Final Donut

The donuts are then dipped in a plain glaze and drizzled with the candy cap caramel. Best enjoyed while still slightly warm.

Black Trumpet Cappellacci dei briganti

Cappellacci dei Briganti, a pasta shape which imitates the hats worn by 19th century guerrilla fighters known as brigands. These self-declared soldiers formed rebel militias and roamed the hills of Southern Italy at the time of the Risorgimento or the unification of Italy. This style of pasta originated in Molise and is typically served with a lamb ragu. When brainstorming pasta dishes that feature foraged wild mushrooms I couldn't help make the connection between the shape of the pasta with black trumpets. I've been wanting to make these since last summer and finally got myself sorted out to make it happen. The pasta dough incorporates a small percentage of dried black trumpet powder to give them their distinct color. The final flavor of the mushrooms is rather subtle as it competes with the hearty lamb ragu but it adds a nice earthy subtext to the dish. It was perfect for a cold winter night with a good glass of red wine in hand and the kids shipped off to Nonna's house. Video of the process below. It’s a lot easier than it looks.

hats 3.jpg

Black Trumpet Cappellacci dei briganti

Ingredients

430 g 00 Flour

20 g dehydrated wild mushroom powder

250 g eggs (beaten before mixing)

*Portioned for 5 - 6 people

Tools:

Circular cookie cutter, conical metal pastry tip (see photos/video for sizing)

Directions

  1. Using a spice grinder (or similar) blitz your dried mushrooms into a very fine powder. Here I’m using black trumpets but you could easily substitute with any other edible wild mushroom.

  2. Mix together the mushroom powder and flour into a bowl, and dump out onto your clean work surface.

  3. Use your hand to form a well (like a volcano) in the center of the flour.

  4. Carefully pour your eggs into the center and begin slowly mixing together with a fork. Gradually, carefully, work your way all around to incorporate the eggs with the flour, without breaking the outer wall.

  5. After about 5 - 10 minutes it will start coming together into a shaggy mass. Begin using your hands to knead the dough together. Work diligently for another 5 minutes until it is no longer shaggy.

  6. Use the edges of your hands, knuckles, to work the dough until it starts to form a smooth ball. Roll it, applying pressure, into the work surface. Fold it. Roll it again. After about ten minutes it should be a smooth, and ready to rest.

  7. Cut the dough into two and wrap each in plastic wrap. Set into the fridge for at least 30 minutes.

  8. The following step revolve around using a pasta attachment on a Kitchenaid - but you could also do this by hand with a rolling pin. Remove one of the dough balls, unwrap, and cut off a portion of the dough. Lightly flour and cover the rest back with plastic. Press gently and form a rectangle.

  9. Pass the dough through the sheet pasta attachment at it’s widest setting. If it feels sticky, add a little more flour. Gradually tighten the settings of the pasta attachment, one click at a time, and pass the pasta sheet through until it is light and delicate. I normally go to the 6th setting.

  10. Allow the sheet of dough (sfoglia) to dry for 2-3 minutes. Use the circle cookie cutter and punch out as many circles as you can on each sheet of pasta dough. Save the scraps for maltagliati.

  11. The next steps become much easier with a visual reference. I have provided a diagram below and the video helps to show the process. Again, it’s easier than you think. Using your metal pastry tip cone, place the large side in the center of one of the pasta circles. The dough should NOT be sticky. You don’t want it to stick to cone.

  12. Fold the sides of the circle over the cone, and gently press them together with your thumb.

  13. Using your other hand, carefully fold down the top of the cone to form what we’ll call the brim of the hat. The metal cone should be concealed inside the shape of the pasta.

  14. Carefully slide the cone out, continuing to press gently at the seem. Flip upside down and allow to air dry for about 15 - 20 minutes before covering and setting into the refrigerator until you’re ready to cook. Repeat the process until you have no dough left. It moves quickly once you find your rhythm.

  15. Cook right away of store in the fridge covered with a towel for up to a day.

flour and eggs.jpg
sheet of pasta.jpg
pasta drawing.jpg
pasta on finger.jpg
hats 2.jpg

Lamb Ragu

Ingredients:

1 lamb shoulder (broken down, trimmed, cut into 1 inch cubes)

1 onion (finely diced)

4 cloves garlic (minced)

½ cup celery (finely diced)

½ cup carrots (finely diced)

8 oz tomato paste

32 oz canned tomatoes (crushed) 

1 cup red wine

2 cups hot broth

2 tbsp fresh sage (finely minced)

2 tbsp fresh thyme (finely minced)

3-4 bay leaves

lamb ragu.jpg

Directions:

Break down the rabbit into 6 pieces. Hind legs, forelegs, and split the body into two. Season with salt and pepper. 

  1. Brown the meat on all sides in a deep pot. The less oil the better for getting a nice brown crust. Set aside. 

  2.  Add the garlic, onions, celery, carrots and herbs and cook on medium/low for a few minutes until softened.

  3. Add the tomato paste, a little olive oil, and mix together until well incorporated.

  4. Pour in your red wine and simmer down for another few minutes. Use a wood spoon to scrape up any bits stuck to the bottom of the pot.

  5. Add tomatoes and bring up to a low simmer. Add about a half a cup of broth and stir.

  6. Add the lamb back into the pot, partially cover, and simmer for 1.5 hours - turning the meat every 15 minutes and stirring the sauce so it doesn’t stick to the bottom of the pan. If the sauce feels like it’s getting too thick add a little more hot broth to thin it out.

  7. It normally takes me about 5 hours until the meat starts to shred and fall apart. This is how you want the ragu, without any big chunks of meat.  

  8. Shred the meat from the bones and pull apart into small pieces. Add the shredded meat back into the ragu and stir together. 

  9. Transfer a few ladles full into another pan and set on low heat. After your pasta is cooked, toss it with the pan ragu. Plate your pasta, add some more ragu on top. 

  10. Top each plate with a generous amount of freshly grated parmesan cheese or pecorino, and some fresh basil. 

finished plate briganti.jpg

Hen of the Woods Chicken Marsala

You'd be hard pressed to find Chicken Marsala on a menu in Italy, but it's pretty ubiquitous here in America. It's become an iconic Italian-American dish that uses Marsala from Sicily, thinly sliced meat (scaloppine), and mushrooms (most frequently flavorless button mushrooms). This weekend in the Catskills I was fortunate to find a few more pounds of Hen of the Woods (Grifola frondosa). In Italy, this species is known as signorina, or "the unmarried woman. For me it's one of the best wild mushrooms around. I was in the mood for something simple and classic and ended up with this rustic Chicken Marsala. There are a million ways to do it, but I went with a Marsala sauce enriched with heavy cream, a rich chicken stock, Mangalitsa lard, herbs, lots of garlic and dark meat instead of breast meat - all cooked in a wood fired oven and served over a bed of fettuccine. Full video of the process below.

maitake chicken marsala.jpg

Ingredients

1 lb of wild hen of the woods (maitake, sliced into thin medium sized pieces)

2 lbs boneless, skinless chicken thighs

1 cup of hot broth

1/2 Marsala

1/4 cup heavy cream

Finely minced onion

3 cloves of garlic finely minced

Fresh thyme (approx 1 tsp)

1/4 cup chopped fresh parsley (for garnish)

2 tbsp pork lard or butter

Salt and Pepper to taste

All purpose flour

Olive oil or canola oil

maitake in laceys hands.jpg

Directions

I like to prepare this dish in a wood fired outdoor oven but it can easily be prepared on the stove top as well.

  1. Using a mallet, pound the pieces of chicken until they are nice and thin. Lightly season with salt and pepper.

  2. Dredge each piece in a bowl of flour, shake off excess, and set aside in a tray while you prepare the rest of the ingredients.

  3. Finely mince one whole medium onion and the garlic, and set aside.

  4. Remove the thyme leaves from their stems, and set aside.

  5. Bring a heavy skillet (I like to use cast iron) up to medium high heat. Add a thin layer of oil to the pan.

  6. Begin pan frying the chicken until they start to turn golden and crispy. Continue cooking until all pieces are cooked, setting aside the finished ones if they don’t all fit in the pan. You’ll want the meat to be mostly cooked through at this point.

  7. Wipe out the pan and pour off any excess oil.

  8. Bring the pan back up to medium high heat and add the lard (or butter).

  9. Add the onions, garlic, sliced mushrooms, and thyme to the pan, and saute for a few minutes, stirring frequently so they begin to cook down.

  10. Add the Marsala, and bring the liquid to a vigorous simmer, cooking it down and reducing it for a few more minutes.

  11. Add the hot broth and the heavy cream and continue cooking down for another 5 - 10 minutes until the sauce is creamy and the mushrooms are fully tender. Season with salt and pepper to taste.

  12. Transfer the chicken back into the pan and continue simmering for another 5 minutes before removing from the heat. It should be really fragrant at this point with the herbs and Marsala.

  13. Serve as is, or over a bed of your favorite pasta. Enjoy!

maitake texture.jpg
maitake fire roasted.jpg

Wild Mushroom Arancini

Here's a spin on a classic Arancini where I've stripped it down to the basics and built it back together using seasonal foraged ingredients. I used an arborio rice and prepared as you would a traditional risotto, layering in a stock fortified with wild mushrooms, parmesan cheese, butter and a ramp puree. Any wild mushroom can be used in this recipe but since it's spring I'm using morels and chicken of the woods mushrooms (separately). Along with the wild mushrooms they're packed with hunks of caciocavallo from Jersey Girl Cheese. I'm still on the fence about Chicken of the Woods, but I found the method described below renders them in a way where they almost resemble bacon or pancetta. Of course you can't really go wrong with morels. These are relatively easy to make, and a great way to incorporate wild seasonal ingredients into classic recipes. Video of the whole process available below.

split open arancini.jpg

Ingredients

Arborio rice (2 cups)

Stock (8 cups chicken or veggie)

Wild mushrooms (1 cup cooked and diced)

Ramp puree (ramp leaves and olive oil)

Caciocavallo cheese (1.5 cups cubed into small pieces)

Parmesan cheese (3/4 cup freshly grated)

Butter (1 stick)

Salt and Pepper

All purpose flour

Plain bread crumbs

Canola Oil

risotto.jpg

Risotto Instructions

  1. Heat your stock in a separate pan and bring to a low simmer. For this recipe I’m using a chicken stock fortified with wild mushrooms to add more depth.

  2. Melt butter in a large pan and add in the rice. Stir well so all the rice is lubricated with the melted butter. Saute for 1 to 2 minutes.

  3. Slowly pour in a cup of hot broth and stir into the rice. For the next half hour, you’ll want to continue adding in one cup at a time so the rice doesn’t stick to the bottom of the pan. Start to finish it will take about 30 minutes, and you’ll want to be constantly stirring.

  4. After about 15 minutes of cooking the rice, gradually adding in more stock as you stir, add in about 1 cup of ramp puree. Since I’m making this a little later in the season, I’m using a batch that watch frozen. It’s a simple puree of ramp leaves and olive oil. If ramps are not available you could substitute this with a nice garlicky pesto.

  5. Add in more broth and continue stirring. The risotto will now be a beautiful green color. Add in the grated Parmesan and continue stirring. Add more broth as necessary. The rice should never be completely covered with broth, but there should always be enough to make sure it’s not sticking to the pan.

  6. Season with salt and pepper to taste and allow the risotto to come to room temperature.

assembling.jpg
finished arancini.jpg

Arancini Instructions

  1. Take a scoop of the risotto in your hands and form a cup in the palm of your hand. Gently pack the rice down so it doesn’t feel loose.

  2. In the middle of the rice, add a few chunks of caciocavallo cheese and the cooked mushrooms.

  3. Take another scoop of rice with your free hand and gently pack it on top. Carefully form the ball together, pressuring it evenly all around, being mindful to patch any weak spots with more rice. It should be roughly the size of a baseball, and hold together well after shaping. Set them aside until you’ve shaped all of your balls.

  4. In medium size bowl, whisk together about a cup of flour to a cup of water to make a paste. It should have the consistency as pancake batter. Put about 2 cups of breadcrumbs into another bowl.

  5. One by one, evenly coat each rice ball in the flour paste. Use your hands to ensure the entire surface is coated. Transfer each ball into the bowl of bread crumbs and roll them around until they have an even coating. Try to avoid large clumps of flour and breadcrumbs. You’ll likely want to wash your hands a few times periodically. Set all of the rice balls into a large tray.

  6. Bring a heavy duty pot of canola oil (or deep fryer) up to 350 F. Make sure it’s deep enough to fully submerge the balls. Fry each rice ball for about 4 -5 minutes each until golden brown, turning periodically so they get an ever color.

  7. Transfer the balls to absorbent paper, paper towels, to soak up some of the excess oil.

  8. Arancini’s are most commonly enjoyed room temperature, but they’re also quite nice when still a little hot. They hold their shape a bit better once they’d cooled down.

Wild Mushroom Instructions

Morels

I’m making these in late spring, so morels are already past peak. I had a good year with morels so I have a small stash of dried morels. I simply soaked them in warm water for 15 minutes, drained, and cooked them just as you would with fresh morels. If using this method, make sure to save the water after soaking, and add it into your stock.

Chicken of the Woods

Full disclosure, COTW is not one of my favorite edibles. They are beautiful to look at, and I’ve been trying to find a way to cook them where I’d be excited about it. I did however enjoy how these turned out, albeit they were more a subtle part of the dish. I braised only the most tender pieces in a chicken stock for about ten minutes. Then sliced the outer most edges super thin into ribbons and sauteed them in some olive oil until they get nice and crispy. Season with a little salt and pepper. The color and texture out of the pan is almost bacon-like.

cotw on board.jpg
crispy chicken.jpg

Spring Morel + Ramp Oil Pizza

This is one of those pizzas that only happens once a year. It is spring at its best in pizza form. And after several years unsuccessfully searching for morels I finally had an opportunity to do what I've been thinking about for a very long time. Sauteed morels, ricotta and mozzarella cheese, ramp oil, wild violet flowers, fresh mint, and a little drizzle of honey on a sourdough crust wood fired in my Ooni Pro. Video of the whole process is embedded below.

morel and ramp pie.jpg

Ingredients:

Fresh morels (sauteed in olive oil)

Fresh ricotta cheese

Shredded mozzarella

Ramp Oil (see instructions below)

Fresh mint

Wild Violet Flowers

Honey

close up of pizza.jpg

Instructions:

The Morels

  1. The real heart of this pizza are the morel mushrooms. For this recipe I chose only the ones in most perfect condition and sliced them in half lengthwise.

  2. Saute the morels in olive oil on medium low heat until they begin to brown. This will take about ten minutes to soften them up. It’s important to cook morels thoroughly.

morels on table.jpg

The Ramp Oil

  1. Clean your ramp leaves in a cold bowl of water to remove any bits of dirt.

  2. Trim the stems off completely leaving only the leaves behind.

  3. Lay in the ramp leaves into your food processor (or blender) and add in good quality olive oil. You’ll have to use your best judgement on the amount depending on how many ramps you’re using. The consistency should be thinner than pesto.

  4. Add a little dash of salt, and blitz for about a minute.

  5. Transfer the puree into a fine mesh sieve and use a rubber spatula to press the oil down into a bowl. What’s left behind is a fragrant mash of ramp leaves with some traces of oil. This can be saved / frozen / and incorporated into countless other dishes. For now, you’re focusing on just the extracted oil that comes out of the sieve.

  6. Transfer the oil into a container, ideally a squeeze bottle with cap. It’s ready to go. Store in the refrigerator.

washing ramp leaves.jpg
making ramp oil.jpg
ramp oil bottle.jpg

The Dough

For the pizza dough I have been very happy using a Ken Forkish recipe from Flour Water Salt Yeast for an overnight dough with levain. It’s one of the few recipes that I have decided not to mess with as it always yields great results.

The Assembly & Finishing

  1. Stretch your dough and drizzle first with a little bit of olive oil.

  2. Layer on your shredded mozzarella cheese.

  3. Now evenly distribute the sauteed morels.

  4. Using a spoon, dollop on the fresh ricotta evenly across the pie.

  5. Bake your pizza. I use a wood fired Ooni Pro but use whatever works for you.

  6. Drizzle on a generous amount of ramp oil.

  7. Drizzle on a swirl of honey.

  8. Top with fresh mint and wild violet flowers.

  9. Enjoy!

Nashville Hot Chicken of the Woods

Experiments in the mushroom lab. This is a play on the classic Nashville Hot Chicken sandwich where I’ve replaced the chicken with wild Chicken of the Woods mushrooms. After finding a perfect early season Chicken of the Woods I spent several months thinking about this idea. Weeks went by without finding any more good specimens. I was always a few days too late. Finally I came across a small grouping of laetiporus sulphureus right when I was feeling most defeated. Video about the process below.

sandwich 2.jpg

It was prepared in the same way that you would use real chicken, battered in a mix of flour, salt, pepper, buttermilk, and homemade one-year vintage fermented hot sauce. Deep fried at 350F and slathered with rendered duck fat, paprika, garlic powder, cayenne, and brown sugar. Then it’s layered onto homemade sourdough buns and topped with butter pickles and red slaw. 

sourdough buns.jpg

The buns are a work in progress but getting closer to the softness and texture that I’m looking for.

pickles and slaw.jpg

The butter pickles and the coleslaw both used a homemade perry vinegar which is aromatic and on the mild side.

hot sauce mash.jpg

The hot sauce I used was from a 2018 batch of fermented chilies and garlic. After being milled it’s blended with 50% white vinegar and stored in the refrigerator. Each year I use a slightly different combination of peppers but this year I’m growing Cornito Rossos, Paper Lanterns, and Arapahos.

chicken spread.jpg
chicken on tree.jpg

Overall, it wasn’t a bad first attempt but it definitely needs some work. After getting a lot of feedback on the recipe it seems like the mushrooms should be water-sauteed briefly before they are battered and fried to reduce the amount of retained oil and to make the interior more tender. Definitely a suggestion that I will take into consideration next time around.

Chanterelle and Pesto Pizza

Summer is in full effect. With a bounty of chanterelles the next obvious thing to do was pizza. This pie features fresh chanterelles, basil pesto, shredded mozzarella, and nastrutium flowers. I wanted to keep it limited to simple fresh ingredients and make the mushrooms really shine. The nasturtium flowers add a subtle sweet and peppery kick and I loved the way the mimic the shape and color of the chanterelles.

The crust is naturally leavened using a Ken Forkish (Flour Water Salt Yeast) recipe as the basis of the dough with some slight timing deviations. Wood fired in the Ooni pro in approximately 60 seconds. I made a short video about the forage and pizza making process. (Embedded below)

chant pesto pie 2.jpg

These were the best chanterelles that I’ve ever found - a large patch of Cantharellus Lateritius in western New Jersey. They were in perfect condition and we came home with a few bags full.

handful of chants.jpg
chants on counter.jpg

I highly recommend Flour Water Salt Yeast if you’re interested in making bread and pizza dough. There are recipes that use commercial yeasts and wild yeasts and all recipes are flexible and easy to adapt for real-world schedules.

chant pesto pie.jpg

Creamy Chanterelle Tagliatelle

After weeks of searching with limited results I finally found myself a proper patch of chanterelles. It was 100 F and muggy as s***, but I trekked out to check a spot I had a feeling about. After an hour of searching I caught a glimpse of the golden beacons on a steep hillside - cantharellus laterius, smooth chanterelles. It was enough to make a real meal and I wanted to make something simple that showcased the mushrooms.

creamy chant pasta.jpg
smooth chant.jpg

I decided to do a simple pasta dish, with an herb & cream sauce. After cleaning off the dirt I gently sauteed the mushrooms in butter, thyme, salt, and pepper. After about 5 -7 minutes I added in a generous pour of heavy cream and brought it to a light simmer for another 2 minutes. At this point the smell is incredible. To the pan I added the cooked tagliatelle, and tossed everything until the noodles were completed coated. After plating, I topped the dish with freshly grated parmesan and black pepper. 

chants on moss.jpg

This is a dish that can convert even the most discerning mushroom skeptics. See video below.

The Spring Fling Pie: Seasonal Toppings from Garden and Forest

Before we hit our stride in mid to late summer I started to brainstorm what kind of pizza to make with early season ingredients. What started off as a late spring garden pie took on a new form after a successful day foraging for spring mushrooms.

1E8E47B1-FD95-4D65-AEB9-44AC97CF4A2F.jpg

Tatsoi greens, Egyptian Walking Onions, wild Crown Tipped Coral and Chicken of the Woods mushrooms, sweet and sour chive blossoms, tatsoi blossoms and a blend of mozzarella, fontina, and provolone cheese all on a sourdough crust - wood fired with the Ooni Pro.

Perfect specimen of Laetiporus Sulphureus.